Spot Colors / Named Colors
Spot Color or Named Color printing uses color names in image files to identify the color for color replacement. So for example, you may use a graphic design program such as Adobe Illustrator to specify a spot color name «Spot_Red1» for one of the colors in your image and save the image.
You can then use one of the Spot Color printing features in the ErgoSoft RIP to print this color in a specific way by replacing the original color recipe in the file with one of your choosing, either a mixture of inks or just a single, specific ink.
This is often used for specific Ink types like fluorescent inks, metallic inks or white inks where colors are not supposed to be part of the regular color management and mixed with other colors, but rather used with selectively with precise amounts applied to the material in specific places.
ErgoSoft RIPs offer 3 main ways for Spot Color Printing. Which one is best suited for you depends on what you are looking to achieve and what your requirements are.
Named Color Profiles
Embeds a Named Color Profile in your Print Environment that specifies the Spot Color Name and a replacement recipe for that color. Whenever this Print Environment processes a suitable image file (EPS, PDF) containing a Spot Color with that name, it will automatically replace the color with your specified recipe.
Named Color Profiles are assosciated with a Print Environment, so they are not a global setting, i.e. switching to a different Print Environment that does not have a Named Color Profile assigned to it means that the Named Color will no longer be detected and replaced. You can however easily ascociate a Named Color Profile with multiple Print Environments.
Creating a Named Color Profile
To set up a Named Color Profile, make sure you have the right Print Environment selected that the Profile should be embedded in. Open the Named Colors dialog through either the button in the Toolbar, or through Tools > Color & Special Features > Named Colors...
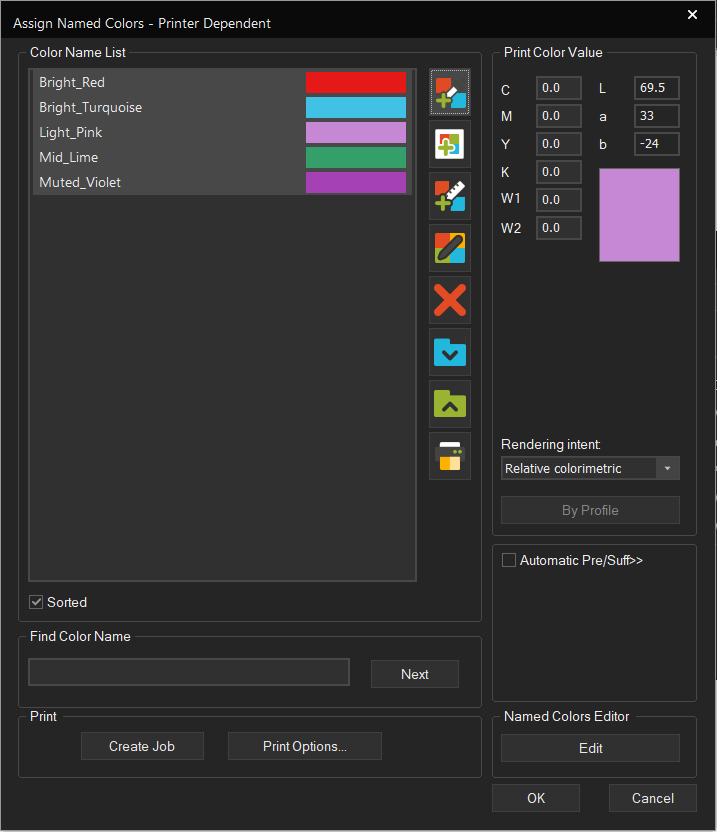
Lets first look at the different sections of the Named Colors window and what each one does:
Color Name List: Lists the named colors in the currently active Named Color Profile with name and preview color swatch. If there is no Named Color Profile in the current Print Environment yet, this list will be empty. This segment also contains the Tools to add new Named Colors and manage the list.
Print Color Value: This is where you set the actual printing recipe for a Spot Color.
Automatic Pre/Suff: Lets you add a prefix or suffix to the selected Named Colors in the list. Simply select the named colors you want to add to (Press Ctrl+Click to select multiple), enter a prefix and/or suffix into the designated fields and press Attach.
To remove a prefix/suffix, select the Named Colors in the list again, enter the part you want removed, and click Detach.
Find Color Name: Lets you search through the Color Name List by entereing a search term.
Print: Opens a new Job and populates it with Named Colors from the list.
Named Colors Editor: Allows for specific modifications to Named Colors, especially for light and dark areas.
Adding a Named Color
There are multiple ways to add a Named Color, accessible through the first 4 buttons next to the color list. The second 4 buttons are for managing colors in the list.
- Color Picker
- Swatchbook
- Measure Color
Specifying the Output Color
In CMYK Values: Once you have added your first Named Color, we need to assign an output color for it. In Print Color Value, enter your desired Recipe that should be used for output. If you are using a CMYK color recipe, simply add the correct values to the respective field.
If you are using a special Ink that you want to adress and you have properly defined your Ink in the Printing Ink Assignment of your Print Environment, you’ll see channels fields for these additional colors as well. If you you are not seeing additional fields, hop over to Print Environment Settings > Printing Ink Assignment and make sure you have assigned your slots (E.g. Spot Color 1, Spot Color White, etc. ).
If you confirm the Named Colors dialog with Ok, it will be saved even if you don’t have an output value defined.
Calculated by Profile: You can also have your Output value calculated by the RIP by using the By Profile button. This will use the Printer profile in your Print Environment to translate the Preview Color (Or Swatchbook color if you used that to define the Named Color) into an output value and automatically fill this value into the Output Value fields. You can also use the Rendering Intent dropdown menu to specify how out of gamut colors should be handled.
Save and Apply the Named Color Profile
Once the Named Color is specified and the Named Color Profile is saved by confirming with OK, the Named Color Profile is active for the Print Environment it is embedded in. Whenever a file is processed that contains a Spot Color that matches one of the names in the list, that color is automatically replace by the specified output value.
However do note that this replacement happens at the raster stage. Therefore it will not be visible when viewing the Job in JobComposer. The JobComposer view will always display the original color in the file, even if the color is later replaced by the Named Colors function.
Managing Named Colors in the List
The lower 4 buttons to the right of the color list let you manage items in your Named Color list. To select multiple Named Colors from the list at once, press Ctrl on your Keyboard and click the Named Colors you want to select.
- Delete: Deletes the selected Named Color.
- Import Named Color: Imports a saved Named Color into the Color List
- Export: Export the selected Named Color(s) to an external file.
- Print Similar Colors: Lets you create a new Job with Variations of the selected Color to find an appropriate color recipe.
- Find Color Name: Enter a search term and click next to Jump to the first color that matches the entirety or part of the search term. Clicking Next again will move to the Next matching color, etc.
Print the Named Color List
Clicking Create Job in the Print segment will take the Named Colors from the Color Name list and create a new Job containing Swatches for the Named Colors in your Color List. This lets you preview the different output values and make sure they match your expectations before using them in an actual large Production Job. To print such a chart, press Create Job, and wait for the Job to be built in the background. Exit the Named Colors dialog with Ok, make any alterations to the image in the Job if necessary, then press the Print button in the JobComposer to send the Job to the printer.
You can also alter the parameters of the Job by clicking the Print Options... button.This lets you customize things like fontsize of the swatch labels, swatch size, number of fields per row, etc. Once you are satisfied with your changes, press Ok to confirm them and press Create Job to generate a Color List job with your new settings.
Embedded Named Color Profiles and Exporting from the Print Environment
Once you confirm your Named Colors Profile with Ok, it will automatically be saved into the currently active Print Environment as an embedded profile.
You can find the Named Color Profile setting for the Print Environment in Print Environment Settings > Extras in the dropdown menu under Named Colors Profile.
As long as the profile is set as embedded, it will automatically be saved with the Print Environment when you export it, it is part of the Print Environment. However while embedded the named color profile will not be accessible to other Print Environments to use. So if we want to use the same Named Color Profile for multiple Print Environments, we’ll need to save it as an external file. To do this, click the Export button and save the Named Colors Profile as an lCC profile. To access it with other Print Environments, you should save it into the default NamedColors folder to make it easily accessible across the RIP.
To access externally saved Named Color profiles, click the External checkbox. This enables the dropdown menu and lets you select a Named Color profile from those saved in the default NamedColors folder.
Once it’s exported, you can use this method to set the Named Color profile in any Print Environment you want, though make sure that the other Print Environments feature the same inks and slot assignment as the initial one to avoid adressing colors the other Print Environment doesn’t have.
If you used the By Profile option to get your output values, it is also recommended to make sure to use the same output profile in the other Print Environments, otherwise the color recipe will not match and output will look different.
Spot Color Replacement in Properties & Actions
To apply Spot Color Replacement to a specific image, import an image that contains Spot Colors into the JobComposer and select it. From the Properties & Actions pane, select Replace Spot Colors.
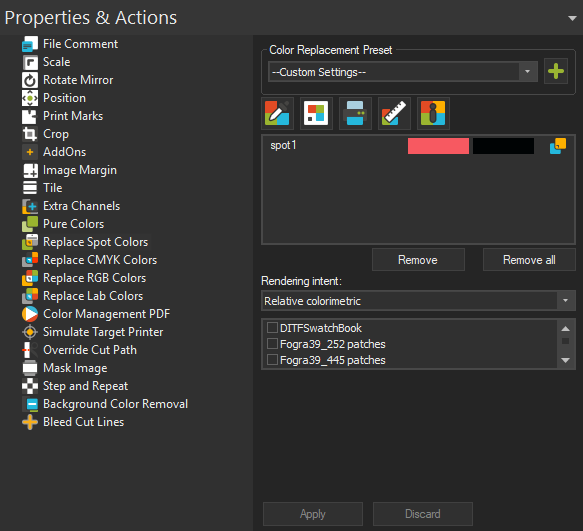
If you are not seeing the Replace Spot Colors option, most likely your image does not contain any spot colors.
Color Replacement Preset
To customize the Color Replacement settings, select -Custom Settings- and adapt the settings for the function as desired. You can also go directly to editing the settings, the Preset will automatically switch to -Custom Settings-.
Once you are done with the settings, you can either leave the Color Replacement Preset setting at the top of the dialog on Custom Settings, or you can click the Add button to create a new Color Replacement Preset. This will save the current settings as a Preset and allow you to apply these exact settings to any image with just two clicks by selecting the Preset from the dropdown.
You can also change the Preset setting to None at any time to remove any effects of the dialog and return the image to its original state.
Selecting the color to replace
You’ll notice that the color list is automatically populated with all spot colors present in your file.
You’ll see two columns of identical color patches at first. The left column represents the original color as it appears in the image, the right represents the replacement color i.e. output color. Since we haven’t defined any replacement colors yet, both columns will look the same (Input and output color are the same).
Select the first color that you would like to replace from the list.
Selecting the Replacement Color
Now, we go on to select the color that should be printed instead. There are multiple different ways how this can be done.
- Color Picker
- Swatchbook
- Measure Color
- Color Wheel
- Measure Color
Color Info
The Color Info window isn’t actually for color selection, but instead it will display information about a selected color.
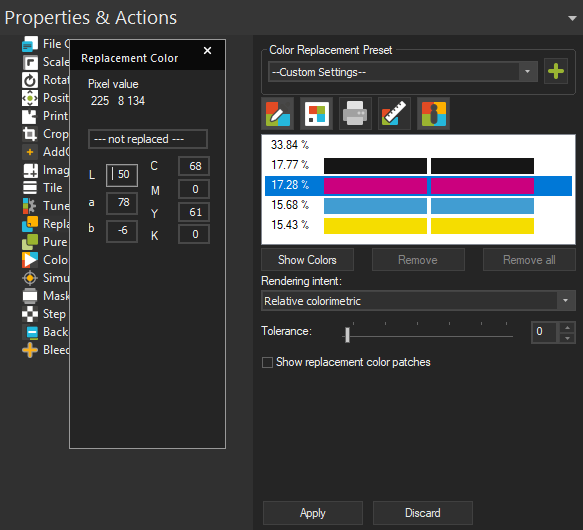
Click the Color Info button above the color list to bring up the dialog.
With the Color Info window open, select one of the colors in your Color Replacement list. The Color Info dialog will show the original pixel value at the top under Pixel Value. In the lower segment the dialog will show the transitional LAB value for the color and the CMYK value that will be used to print the color.
You can also inspect colors from a selected image by picking the color from the selection window. With the Color Info window open, hover over the preview in the Selection window and the cursor will change to a color picker icon. Click to select a color and Color Info will display the original pixel value, the transitional LAB value and the output CMYK value of the color you selected.
Final Configuration and Saving your Settings
Once you have chosen your replacement color, you’ll see that the color in the right column of the color list has changed to reflect the new output color.
Use the Rendering Intent dropdown menu to specify what rendering intent should be applied if the replacement color ends up in outside the printers gamut.
Click Apply again in the Spot Color Replacement dialog to apply the replacement to the image. You’ll notice that the replacement color now also shows up in the Job Preview.
Spot Color Replacement in Application Defaults
The Spot Color Replacement option in Tools > Application Defaults let you set global replacement parameters that are automatically applied to all suitable images that are imported into the JobComposer.
To use Spot Color Replacement, go to Tools > Application Defaults > Color Replacement and select Spot.
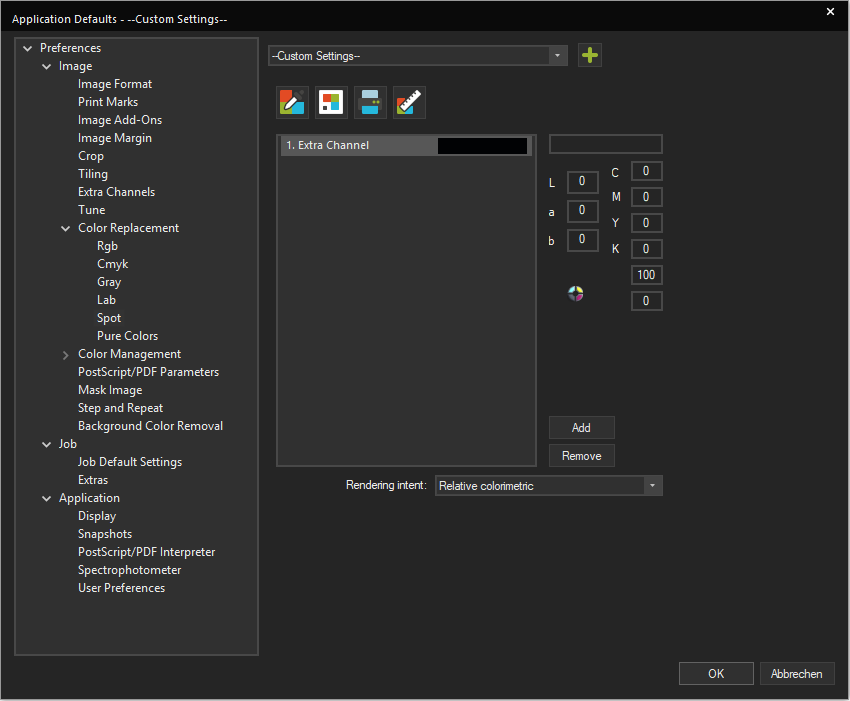
Adding a Spot Color
First, switch the Preset dropdown menu at the top of the dialog from None to Custom Settings. Since this is a default setting, the color list will appear empty and not take into account any images in the current Job.
To define a new Spot Color, click the Add button. You’ll notice that here, the Spot Color is automatically called 1st Extra Channel. This is because in this option the Spot Color is not assigned based on its name, but rather by the position of the channel in the file. So if e.g. you have the 4 base colors CMYK and 1 Spot Color, that spot Color will be the 1st Extra Channel. If you have more, the 5th channel in the file will be the 1st extra channel, the 6th the second, etc.
Selecting the Replacement Color
With the list entry still selected, use one of the Icons at the top of the list to specify what your the color on the left should be replaced with.
- Color Picker
- Swatchbook
- Named Color
- Measure Color
Final Configuration and Saving your Application Defaults
Once you have chosen your replacement color, you’ll see that the color in the right column of the color list has changed to reflect the new output color.
Use the Rendering Intent dropdown menu to specify what rendering intent should be applied if the replacement color ends up in outside the printers gamut.
Once you are satisfied with your settings, confirm the dialog with Ok to save. The Spot Color replacement you specified will be applied starting the next Job.
Spot Color Replacement in Presets
The Spot Color Replacement options in Image Presets let you set replacement parameters that are automatically applied to all suitable images that are imported into the JobComposer as long as the Preset is active, or when the Preset is manually assigned to an image through Right Click > Image Preset > Your Image Preset name.
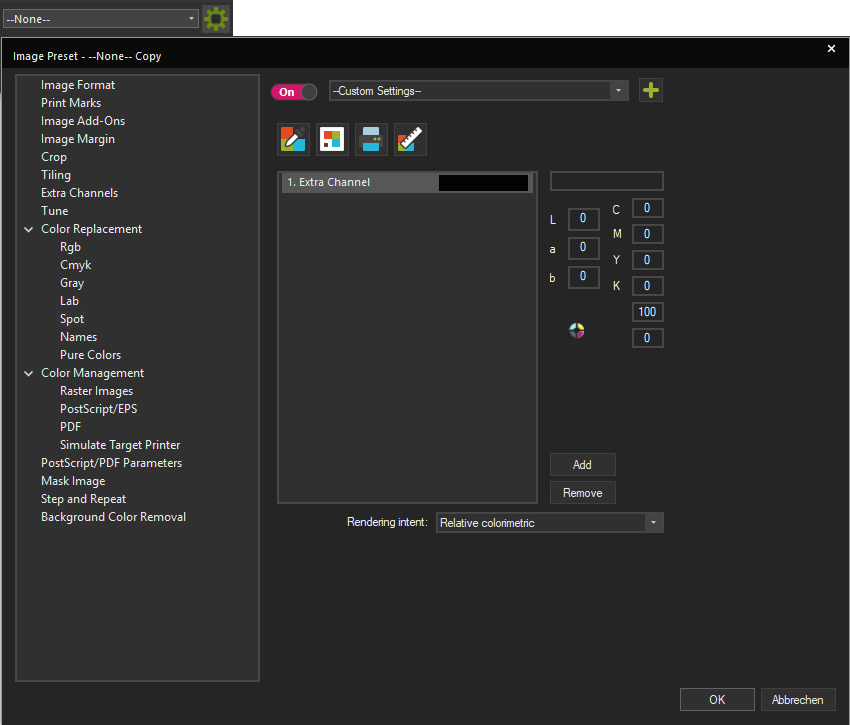
To create a new Image Preset with Color Replacement, either click the New Image Preset button in the Toolbar, or go to Tools > Edit Preset > Composite Presets > Image Preset and click the New button.
For Spot Color Replacement, go to Image Preset > Color Replacement and access Spot.
Adding a Spot Color
First, switch the Preset dropdown menu at the top of the dialog from None to Custom Settings. Since this is a default setting, the color list will appear empty and not take into account any images in the current Job.
To define a new Spot Color, click the Add button. You’ll notice that here, the Spot Color is automatically called 1st Extra Channel. This is because in this option the Spot Color is not assigned based on its name, but rather by the position of the channel in the file. So if e.g. you have the 4 base colors CMYK and 1 Spot Color, that spot Color will be the 1st Extra Channel. If you have more, the 5th channel in the file will be the 1st extra channel, the 6th the second, etc.
Selecting the Replacement Color
With the list entry still selected, use one of the Icons at the top of the list to specify what your the color on the left should be replaced with.
- Color Picker
- Swatchbook
- Named Color
- Measure Color
Final Configuration and Saving your Preset
When you have selected a replacement color, you should see output values in the LAB and CMYK fields to the right.
Use the Rendering Intent dropdown menu to specify what rendering intent should be applied if the replacement color ends up in outside the printers gamut.
Once you are satisfied, confirm with Ok to save your Image Preset. From now on every time an image is imported while this Preset is active or when this preset is manually applied to an Image through Right-Click > Image Presets > Your Preset, the color replacement will be applied.
Print Environment Ink Channel Settings
If you are looking to directly map a Spot Color in the image file to a special Ink Slot and print that Spot Color with just that ink, the easiest way to do that is to assign the Spot Color to the slot using the Ink Channel Settings of the Print Environment.
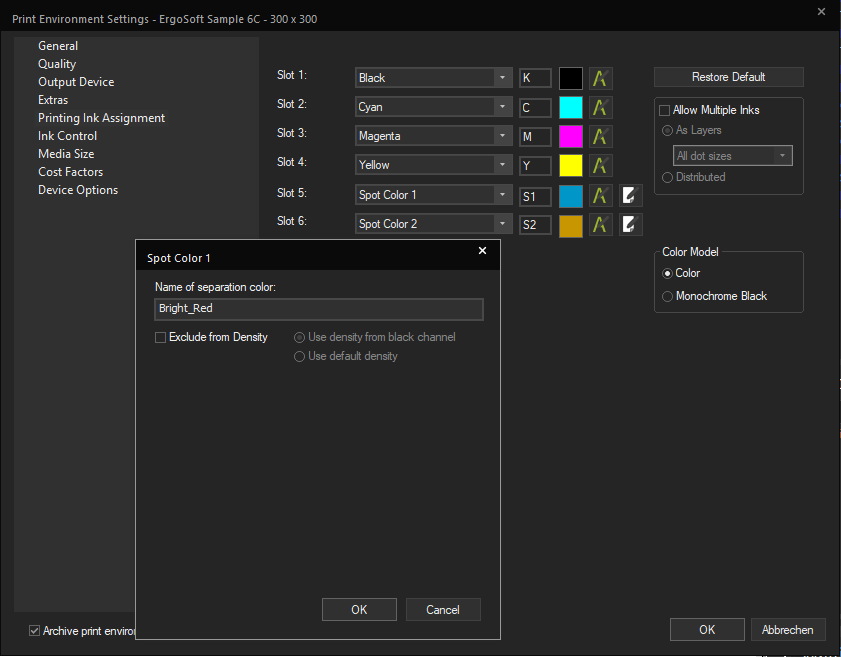
To configure this, go to Print Environment Settings > Printing Ink Assignment. Make sure your Print Environment has enough ink slots (As 4 are required for CMYK already) and assign one slot to the proper Spot Color type such as Spot Color 1, Spot Color White, Finish/Varnish, etc.
On Ink channel types that can be configured for Spot Colors, you’ll notice an Edit button appearing next to the dropdown menu. Click that button to configure the Spot Color.
In Name of separation color, enter the name of your Spot Color as it will appear in the image file you are processing. Note that this is case sensitive.
By default, a row of swatches for the Spot Color will be printed along with the Profile colors during density linearization, if you don’t want this and instead would like to use either the density from black or the default density, check the Exclude from Density box and select either Use density from black channel, or Use default density depending on your preferences.
Note that if you are using any of the other Spot Color printing methods outlined here, you should leave Name of separation color empty as it can conflict with those methods and cause no replacement to happen.
Repeat the proces for all Spot Colors you want to adress this way. Confirm the dialog with OK, then confirm the Print Environment dialog with Ok as well
Once the settings are saved, whenever a Spot Color with that name appears in a file, it will be printed only with the ink from the slot you specified. The ink will take the opacity of the color in the file and adjust it through the density (Either measured or from black/default) to bring it in line with the color intensity of the rest of the image.
Assign Spot Colors by Image Channel
Multi-Channel TIFF Files
For Multi Channel TIFF files (TIFFs with more than the standard RGB or CMYK channels), the ErgoSoft RIP automatically takes care of the channel assignment to the individual channels. If Spot Channels are defined in the printing Ink Assignment, then the additional channels in an image file are automatically assigned to them and printed accordingly.
For example, a CMYK TIFF with 2 additional channels (5+6) and your Printing Ink assignment in the Print Environment setting is CMYK + Spot Color 1+Spot Color 2. When you import and print the TIFF file, the 5th channel in the TIFF will automatically be printed with Spot Color 1, the 6th Channel with Spot Color 2.
In this process, the regular profile colors (RGB or CMYK) will undergo the regular ErgoSoft RIP color management, so density and profile are applied. The additional color channels however are ignored by the profile and only the density is applied to ensure that the output is not overinked.
Note that the ErgoSoft RIP usually can not know what color the additional channels actually are. Therefore previews for additional color channels like this are created with Red, Green and Blue in diminuished saturation. So the preview shown in the JobComposer will not be color accurate, but the final output will be correct, since the RIP will simply send color information to the respective channel (e.g. print 70% of Ink Slot 5 here) so that channel is printed instead of the placeholder Red, Green and Blue.
Related Articles
Spot Color Replacement Preset no longer works after Ergosoft update
Problem/Question After updating Ergosoft, existing Spot Color Replacement Presets may no longer work as expected. You may notice that spot colors are not replaced correctly, even though the preset configuration itself appears unchanged. ...Pure Colors
One of the clever little tools ErgoSoft RIP users have at their disposal to exert more control over the colors they are printing. Pure Colors lets you tell the RIP that certain colors should only be printed using their respective ink. So for example ...Printing White Ink or Finish
For this article, we will use white printing as the primary example, but all the steps also apply to printing similar special fluids such as primer, varnish, etc. Simply adapt the Printing Ink Assignment to reflect the proper type of fluid. General ...How to Print a Color Library
Problem/Question How can I print my entire Swatchbook or Named Color Library? How to print a color library in Ergosoft. Solution/Work-Around There are two options for printing a full color library in Ergosoft. This can be helpful for output ...Color Replacement Introduction
Color Replacement is used a variety of different applications in Digital printing. ErgoSoft RIPs offer several different ways to replace colors in your digital printing files for different applications and filetype. Be it pixel replacement in your ...