Extra Channels
Allows you to map channels in the image file to output channels and set different parameters for how the channels should be treated for output. This can be used to e.g. map a spot color channel in your image file directly to a special ink cartridge like Fluorescent Yellow on the printer to print in specific areas.
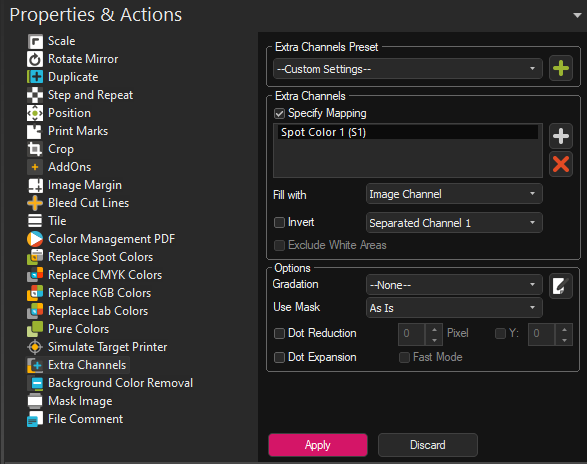
To access Extra Channels, select your image file and go to Properties > Extras Channels. Set the Preset drop down menu to Custom Settings. Note that the Extra Channels dialog is only available if you you have assigned at least one Spot-type channel such as Spot Color, Spot Color White, Finish/Varnish in Print Environment Settings > Printing Ink Assignment.
The Extra Channels section within the dialog lists the available channels as they appear in the Printing Ink Assignment.
To begin assigning channel settings, check the box Specify Mapping and select one of the listed channels.
If you have multiple extra color channels defined your printing ink assignment, you might need to manually add further ones using the Add button to the right of the colors list
To clarify, when we are talking about the Extra Channel in this article, we are talking about the special ink channel of the printer. Filling this special ink channel means to specify where the special ink should be printed.
Fill With
Below the channel list, you’ll see the Fill with menu. This lets you specify where the selected color should be printed, i.e. what this color channel should be filled with.
There are a lot of different options here that let you tailor how you want to print your special colors exactly to your needs.
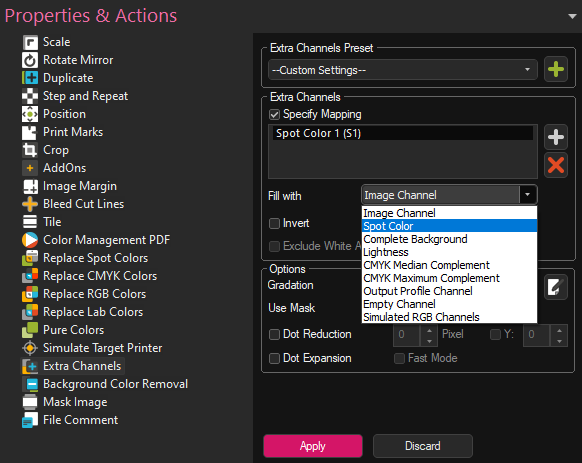
Image Spot Channel: Uses spot channels defined in the image file based on the order they appear in. So you can select if the select Extra channel in the printer should be mapped to the 1. Extra Channel in the file, the 2. Extra Channel in the file, etc. in the dropdown menu below the Fill with selection.
Spot Color: Uses named Spot Colors in the image file to fill the Extra Channel. When selecting Custom Color, the dropdown menu belo Fill with will list the names of the Spot Colors found in the selected image file. Simply select the one you wish to use fill the Extra Channel. If the list is empty, make sure that there are actually named spot colors defined in your image file.
Complete Background: The Extra Channel is filled with the complete image background. So if your image is 50cmx50cm, the entire area will be filled with the Extra Channel color. Transparency and density of the image file will be ignored, so the area is filled with 100% of the Extra Channel color.
Lightness: Uses the lightness/density of the image file to determine where to print the special color (No extra channels in the file are needed). Lighter areas in the image will have lighter application of the special color and darker areas more. Can also be invertred to have transparent areas have full special color application and vice versa.
CMYK Median Complement: Uses the inverted lightness of the output data to determine where to print the special color. Lighter areas in the image will have a higher application of the special color and darker areas less. At the same time, CMYK Median Complement takes the total ink limit of the print environment into account, ensuring that it is not exceeded by too much (By how much depends on the average density of profile ink channels in a given area).
CMYK Maximum Complement: Uses the inverted lightness of the output data to determine where to print the special color. Lighter areas in the image will have a higher application of the special color and darker areas less. At the same time, CMYK Maximum Complement strictly adheres to the total ink limit of the print environment, ensuring that it is not exceeded.
Output Profile Channel: Lets you select one of the profile channels (Cyan, Magenta, Yellow, Black) to be mirrored by the extra channel. So selecting e.g. Cyan will make the extra channel print the same output as the Cyan channel.
Empty Channel: Will just make the selected Extra Channel output empty, so nothing is printed in this channel.
Simulated RGB Channels: Lets you select one of the RGB channels in the image to be mirrored by the extra channels. The RGB values are calculated/simulated internally since usually either the input or output colors are not RGB.
The Invert checkbox lets you invert the content of the channel fill, so e.g. if you are using Image Spot Channel to control white ink but want to print everything except the content of the spot channel with white, you can just invert the channel, so filled areas are empty and vice versa.
Exclude White Area is available with the Complete Background, Lightness, CMYK Medium Complement and CMYK Maximum Complement fill options and allows you to treat white areas as transparent and not fill them with the Extra Channel color.
Channel Options
Gradation
Lets you affect the density of the Extra Channel through a gradation curve. The gradation curve control the minimum density, maximum density and the progression from one to the other. The gradation comes with two predefined options:
50 Percent: Limits the maximum density of the extra channel to 50%
50% Invers: Limits the maximum density of the extra channel to 50% and inverts it, so empty areas of the image are filled with the Extra Channel, while areas containing color are left empty.
You can also create custom gradations to tailor its values exactly to your requirements and to achieve special effects.
To access the gradation edit window, click the «Edit» Button to the right of the gradation dropdown.
The horizontal axis represents the theoretical channel density. Think of this as the input density, i.e. the density for a channel that is defined in the file. The bottom left corner is zero or no density, the bottom right corner is the full or maximum density for the channel.
The vertical axis represents the output density of the channel. The bottom right corner is zero or no density, the top right corner is the maximum density.
Using this graph lets us map an input density value to an output density, affecting the ink output in that channel. An easy example would be if we notice that the white channel applies too much ink. By adjusting the vertical endpoint to a lower value, e.g. 70%), we specify that the maximum available density (100% on the input/horizontal axis) may not exceed the 70% of the vertical axis. This maps 100% input density to 70% output density effectively limiting the density of the white channel to 70%, decreasing ink application in a linear fashion as a result.
The gradation curve also lets you specify additional points in the curve itself by clicking any point on the line and dragging it to the desired point. This allows for complex adjustments and non-linear density gain to match and customize printer and ink behavior.
Use Masks
Sets wether transparency in the original image file will be honored when filling the Extra Channel. Note that this might not be available for all Fill options. There are 3 possible settings.
None: Transparency mask is ignored, the entire image area is filled in the extra channel.
As is: Uses the Transparency Mask in the file to determine where the Extra Channel is filled.
Inverted: Inverts the Transparency mask for the image. Areas that are empty in the image are filled in the extra channel, and vice versa.
Dot Reduction: Reduce the printed color dots inward to avoid colors showing through at the edges. Pixel reduces dots all around the circumference of the image, while Y only reduces generated pixels along the y axis.
Dot Expansion: Expands the printed color dots outward to increase the area where pixels are generated. Pixel expands dots all around the circumference of the image, while Y only reduces generated pixels along the y axis.
Fast Mode: Makes generation of the extra channel layer faster (Useful for complex images) but less precise.
Related Articles
Using the Ink Assignment Chart to find the correct Ink Assignment order
Setting up your Print Environments ink assignment isn't always as simple as following the order of ink in your printer. Sometimes your ink assignment should be CMYK and sometimes KCMY and when you add extra channels like Orange and Blue it can be ...Color Replacement Introduction
Color Replacement is used a variety of different applications in Digital printing. ErgoSoft RIPs offer several different ways to replace colors in your digital printing files for different applications and filetype. Be it pixel replacement in your ...Epson SureColor SC-S806x0 Double Side Layer Printing
This article gives an introduction into configuring a Print Environment of an Epson SureColor SC-806x0 to print double side layer jobs, using different images on the top layer and bottom layer areas. Add and Configure Epson SureColor SC-S806x0 Add a ...Mimaki UCJV Series: Day & Night / Double Sided Printing
This document gives an introduction into configuring a Print Environment of a Mimaki UCJV-150/300 for a Day & Night print and using the double-sided job layout. Add and Configure Mimaki UCJV-150/300 Retrieve print modes and dot size volumes from the ...Roland VersaUV LEC2 Series Double Side Layer Printing
This document gives an introduction into configuring a Print Environment of an Roland VersaUV LEC2 Series to print double side layer jobs, using different images on the top layer and bottom layer areas. Add and Configure Roland VersaUV LEC2 Series ...