Printing White Ink or Finish
For this article, we will use white printing as the primary example, but all the steps also apply to printing similar special fluids such as primer, varnish, etc. Simply adapt the Printing Ink Assignment to reflect the proper type of fluid.
General Preparations for White Printing
Regardless of the exact method used for white printing, we’ll first need to configure our white channels in the Print Environment Settings.
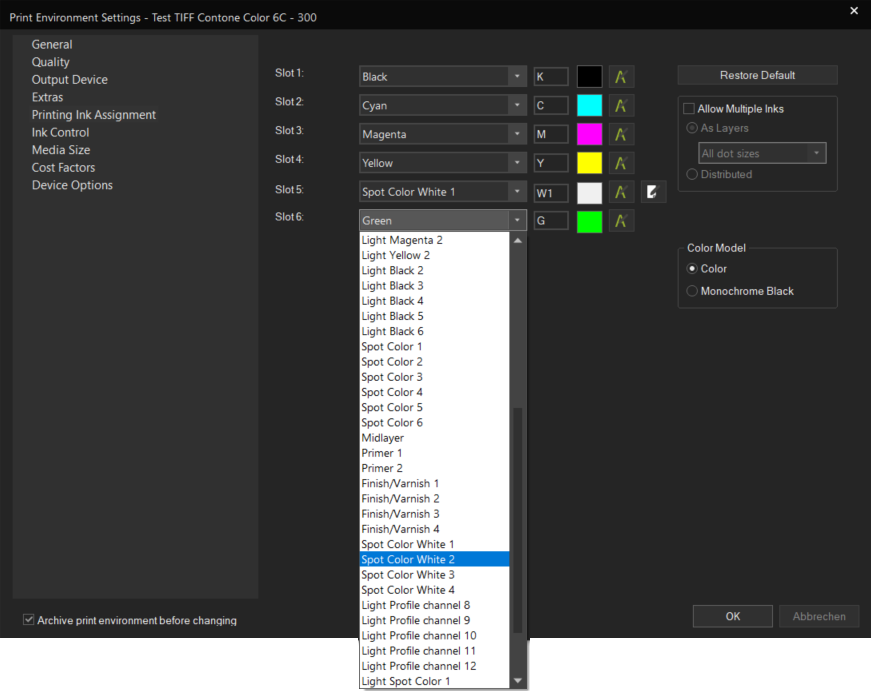
Set up a new Print Environment that either already has a white setup pre-configured (Such as CMYKWW) or simply one that has more than 4 channels. Open Print Environment Settings > Printing Ink Assignment and configure your ink slots. Make sure to configure your white slots as Spot Color White #.
If you have mutliple white slots and want to use your white ink slots independently of each other (distributed), select different numbers for them (E.g. Spot Color White 1 and 2). If you want to always use your white inks slots together to increase density, check Allow Multiple Inks and assign the same number to both slots (So e.g. you have two slots set to Spot Color White 1).
You may also want to configure the density of your white channels by opening the channel settings using the button to the right of the dropdown. By default, white will be included in the density linearization, i.e. a row of patches will be printed during linearization. However you can also check Exclude from Density and use one of the following modes:
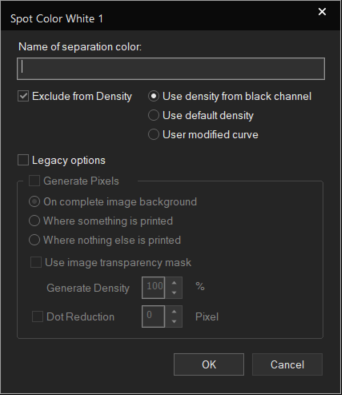
- Use Density for Black Channel: Uses the measured density for black on the white channel too
- Use Default Density: Uses the default density of the ErgoSoft RIP.
- User modified curve:
When you are done, confirm your Print Environment Settings with Ok. From here, we are ready to configure white usage in different ways.
Printer specific options
Some printer models support special settings to configure usage of white ink such as ink order, dry time, etc. When available, these settings are found in Print Environment Settings > Device Options and can be configured there. Since there are many different sets of options depending on the printer and manufacturer, it’s not possible to cover them all in this guide, but generally you should be able to find explanations of the different options and settings in the printers manual, as the Device Options drive printer internal features provided by the manufacturer.
If you do not find any white specific settings in the Device Options, check if you have selected a Print Environment with a white color configuration. If there is no base Print Environment with white, most likely this printer model not officially support them. You can still use white if there are more than 4 channels, but you might not be able to use functions such as ink printing order.
Automatically Generated White Layer (Legacy)
ErgoSoft RIPs feature the ability to automatically generate white layers over an area. No need to prepare your files beforehand! Instead use the image area or transparency to generate an automatic white layer for any file processed by the RIP.
To activate automatically generated white layers, go to Print Environment Settings > Printing Ink Assignment. Open the Modify Channel window.
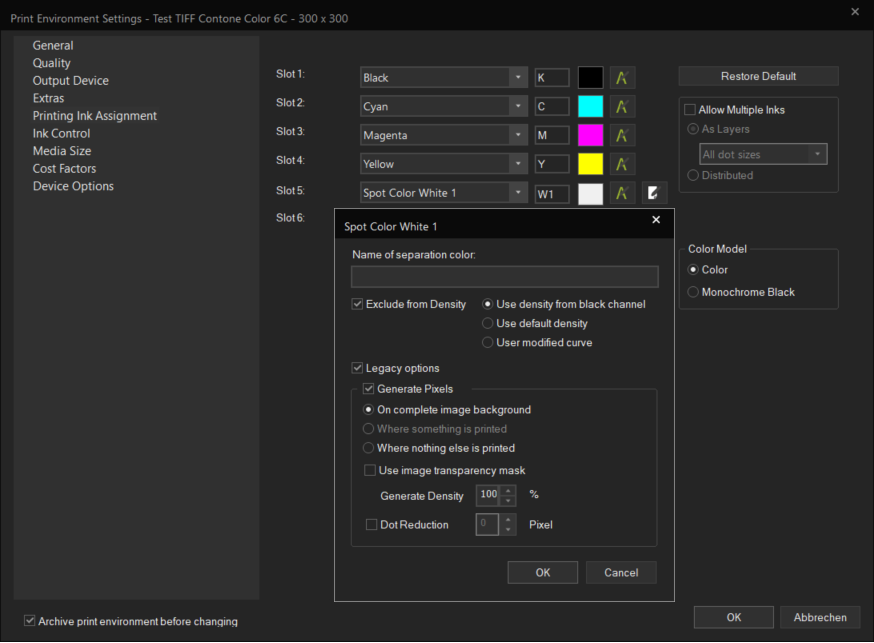
Activate Legacy Options and then Generate Pixels. This will generate a white layer in the specified area for any file printed with this Print Environment. The available modes are:
Over complete image background: Generates white over the complete image area, even areas that are defined as transparent. This usually results in a rectangular solid white area.
Where something is printed: Generates white under parts of the image where pixels are printed. So if e.g. your image is a filled circle over transparent background, white will be printed under the circle, but not under transparent areas.
Where nothing else is printed: Generates white under parts of the image where no pixels are printed. So if e.g. your image is a filled circle over transparent background, white will be printed under transparent areas, but not under the circle.
To have the white layers density adjust based on the transparency of the color pixels in the image, check Use Image Transparency Mask.
If you are noticing the white area extending into areas where it should not be due to pixel rounding or stray color pixels in transparent areas, you can use the Dot Reduction feature to decrease the size of the white area by the specified amount of pixels. So setting e.g. 3 will shrink every generated white area by 3 pixels.
Confirm with Ok and repeat the configuration for all ink channels that you want to use this way. Confirm the Print Environment Settings with Ok as well.
From this point on, any image printed with this Print Environment will have an automatic white layer printed according to your configuration.
White with a Named Color Profile
Named Color printing uses color names in image files to identify the color for color replacement. So for example, you may use a graphic design program such as Adobe Illustrator to specify a spot color name «Spot_White1» for one of the colors in your image and save the image.
You can then use the Named Color feature in the ErgoSoft RIP to specify that whenever a suitable image file (EPS, PDF) color named «Spot_White1» appears in a file it should be printed as white.
Named Color Profiles are ascosciated with a Print Environment, so they are not a global setting, i.e. switching to a different Print Environment that does not have a Named Color Profile assigned to it means that the Named Color will no longer be detected and replaced. You can however easily ascociate a Named Color Profile with multiple Print Environments.
Creating a Named Color Profile
To set up a Named Color Profile for white printing, make sure you have the correct Print Environment selected and that the Print Environment has at least one Spot Color White channel in Print Environment Settings > Printing Ink Assignment.
Open the Named Colors dialog through either the button in the Toolbar, or through Tools > Color & Special Features > Named Colors...
Adding a Named Color
With the Named Colors dialog open, lets add a Named Color to the Color List. To do this, open the Color Picker using the Icon. Select a preview color from the dialog. This does not necessarily need to be white as it is only used in the color list to identify the color. Click Apply to add the color to the list.
Next you’ll be prompted to add a name for the color. This step is very important!
Make sure to use the exact same name as the Spot Color you have defined in the file. In our example, we would name it «Spot_White1» (Case sensitive).
The name is used to identify the color in the file, so if the named is spelled differently, the color will not be recognised and no white will be printed.
If you want to doublecheck the name in the file, you can always right click on the image in the JobComposer, select Properties, then go to Postscript/PDF and open the Used Resources entry. Any Spot Colors detected in the file will be listed in either Separation Colors or DeviceN Colors. If a Spot Color does not appear here, it is not being detected by the RIP and probably not properly saved in the file.
Specifying the Output Color
Now that we have a Named Color defined. We need to assign an output value to it, i.e. tell it to print white for this color.
To the right you’ll see the Print Color Value section. This is were we enter our output color recipe. Assuming your Print Environment has 6 slots with CMYK and 2 white channels, you’ll see numerical fields for C, M, Y, K, W1, W2. W1 and W2 are your white channels.
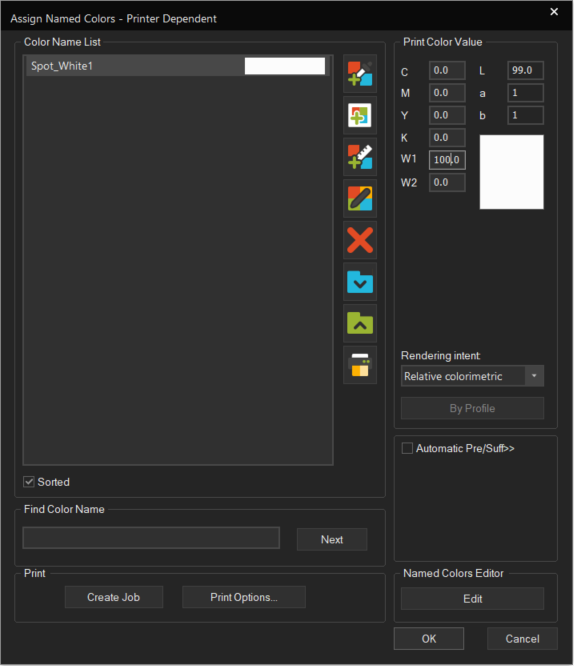
Simply select the Named Color from the Color List and enter your desired values from 0-100 into the W1 and W2 fields. 100 means 100% ink is applied in the printout where coverage of the color in the file is also 100%. The value scales with the density of the color in the image, so with 100, areas where the density in the image is only 50%, output will also only be 50%.
Save and Appy the Named Color Profile
Once the Named Color is specified, the Named Color Profile can be saved by confirming with OK. The Named Color Profile is then embedded into the Print Environment and active. Whenever a file is processed that contains a Spot Color that matches the name of our spot color, that color is automatically replaced and printed as white.
However do note that this replacement happens at the raster stage. Therefore it will not be visible when viewing the Job in JobComposer. The JobComposer view will always display the original color in the file, even if the color is later replaced by the Named Colors function.
For more information on Named Color Profiles, see Color Replacement > Named Color Profiles
White with Spot Color Replacement
White ink can also be printed by using the Spot Color Replacement features in ErgoSoft RIPs. Since there are several ways to do this, we’ll cover them one by one in regards to white printing.
White with Spot Color Replacement in Properties & Actions
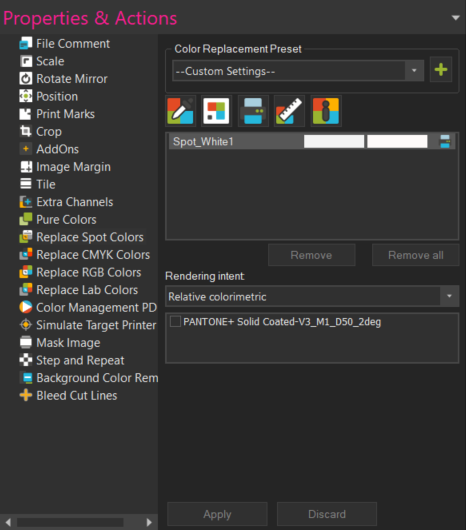
To apply Spot Color Replacement for white ink to a specific image, import an image that contains a Spot Color into the JobComposer and select it. From the Properties & Actions pane, select Replace Spot Colors.
If you are not seeing the Replace Spot Colors option, most likely your image does not contain any spot colors.
Color Replacement Preset
To customize the Color Replacement settings, select -Custom Settings- and adapt the settings for the function as desired. You can also go directly to editing the settings, the Preset will automatically switch to -Custom Settings-.
Once you are done with the settings, you can either leave the Color Replacement Preset setting at the top of the dialog on Custom Settings, or you can click the Add button to create a new Color Replacement Preset. This will save the current settings as a Preset and allow you to apply these exact settings to any image with just two clicks by selecting the Preset from the dropdown.
You can also change the Preset setting to None at any time to remove any effects of the dialog and return the image to its original state.
Selecting the color to replace
You’ll notice that the color list is automatically populated with all spot colors present in your file.
You’ll see two columns of identical color patches at first. The left column represents the original color as it appears in the image, the right represents the replacement color i.e. output color. Since we haven’t defined any replacement colors yet, both columns will look the same (Input and output color are the same).
Select the first color that you would like to replace from the list.
Selecting the Replacement Color
Now, we go on to select the color that should be printed instead. There are two different ways how this can be done.
- Color Picker
- Named Color
White with Spot Color Replacement in Application Defaults
The Spot Color Replacement option in Tools > Application Defaults let you set global replacement parameters that are automatically applied to all suitable images that are imported into the JobComposer. Of course, we can also use this to print white.
To use Spot Color Replacement, go to Tools > Application Defaults > Color Replacement and select Spot.
Note that you can also use the RGB, CMYK, LAB, etc Color Replacement functions in Color Replacement to replace a pixel color in the file with white, it works pretty much the same way as described below, but is less flexible than using Spot Colors.
Adding a Spot Color
First, switch the Preset dropdown menu at the top of the dialog from None to Custom Settings. Since this is a default setting, the color list will appear empty and not take into account any images in the current Job.
To define a new Spot Color, click the Add button. You’ll notice that here, the Spot Color is automatically called 1st Extra Channel. This is because in this option the Spot Color is not assigned based on its name, but rather by the position of the channel in the file. So if e.g. you have the 4 base colors CMYK and 1 Spot Color, that spot Color will be the 1st Extra Channel. If you have more, the 5th channel in the file will be the 1st extra channel, the 6th the second extra channel, etc.
Selecting the Replacement Color
Now, we go on to select the color that should be printed instead. There are multiple different ways how this can be done.
- Color Picker
- Named Color
Confirm the Application Defaults window with Ok. From now on, the RIP will replace the selected color (e.g. the first extra channel) with white when it appears in a file.
White with Spot Color Replacement in Presets
The Spot Color Replacement options in Image Presets let you set replacement parameters that are automatically applied to all suitable images that are imported into the JobComposer as long as the Preset is active, or when the Preset is manually assigned to an image through Right Click > Image Preset > Your Image Preset name.
To create a new Image Preset with Color Replacement, either click the New Image Preset button in the Toolbar, or go to Tools > Edit Preset > Composite Presets > Image Preset and click the New button.
For Spot Color Replacement, go to Image Preset > Color Replacement and access Spot.
Adding a Spot Color
First, toggle the On/Off switch at the top of the dialog to On. The Preset dropdown menu of the dialog will now switch from None to Custom Settings. Since this is a default setting, the color list will appear empty and not take into account any images in the current Job.
To define a new Spot Color, click the Add button. You’ll notice that here, the Spot Color is automatically called 1st Extra Channel. This is because in this option the Spot Color is not assigned based on its name, but rather by the position of the channel in the file. So if e.g. you have the 4 base colors CMYK and 1 Spot Color, that spot Color will be the 1st Extra Channel. If you have more, the 5th channel in the file will be the 1st extra channel, the 6th the second extra channel, etc.
Selecting the Replacement Color
Now, we go on to select the color that should be printed instead. There are multiple different ways how this can be done.
- Color Picker
- Named Color
Confirm the Image Presets window with Ok. From now on, whenever this Image Preset is active or directly assigned to an image file through Right-Click > Image preset > Your Image Preset it will replace the selected color (e.g. the first extra channel) with white when it appears in a file.
When using this method, the replacement color will not show up in the image preview in the Job Composer, as the color replacement is applied at the raster stage, but not before.
White with Pixel Color Replacement
Pixel color replacement uses pixel color values to identify and replace color in an image either by selecting it from the image itself, or by specifying a color value in CMYK or RGB beforehand that the RIP will then identify and replace when it appears in an image file.
Due to technical limitations in PostScript Color Management, Pixel Color Replacement is only fully supported for raster file types (tiff, jpg, png, bmp), but not for PostScript based filetypes such as PS and EPS. Starting in Version 15 there is pixel color replacement support for PDF files.
There are 3 distinct methods to use Pixel color replacement, depending on when and how you want to use the function: In Properties & Actions (Image specific), in Application Defaults (Global across the entire ErgoSoft RIP) and in Presets (Whenever that Preset is active). All 3 can be used to set up white printing, but only one should be used at a time as they may conflict.
Pixel Color Replacement in Properties & Actions
To apply Pixel Color Replacement to a specific image to print white, import the image into the JobComposer and select it. From the Properties & Actions pane, select Replace Colors.
For PDF files, you’ll see 3 different options: Replace CMYK Colors, Replace RGB Colors, Replace LAB colors, simply select the one that matches the color space of your image.
Color Replacement Preset
To customize the Color Replacement settings, select -Custom Settings- and adapt the settings for the function as desired. You can also go directly to editing the settings, the Preset will automatically switch to -Custom Settings-.
Once you are done with the settings, you can either leave the Color Replacement Preset setting at the top of the dialog on Custom Settings, or you can click the Add button to create a new Color Replacement Preset. This will save the current settings as a Preset and allow you to apply these exact settings to any image with just two clicks by selecting the Preset from the dropdown.
You can also change the Preset setting to None at any time to remove any effects of the dialog and return the image to its original state.
Selecting the color to replace
You’ll notice the initially empty list section at the center of dialog. Press the Show Colors button. The list will now populate with the most commonly appearing colors in the image.
You’ll see two columns of identical color patches at first. The left column represents the original color as it appears in the image, the right represents the replacement color i.e. output color. Since we haven’t defined any replacement colors yet, both columns will look the same.
Note that photos will contain a huge amount of colors making up subtle shifts in tone that are not «one color». Many perceived colors like skin tones might not show up in the list at all, since they are made lots of different colors that each appear very little in the image. If you want to replace multiple similar tones together, you can use the Tolerance slider towards the bottom of the dialog to increase the range of when values are still considered the same color.
Select the first color that you would like to replace from the list.
Selecting the Replacement Color
Now, we go on to select the color that should be printed insteadFor white printing, there are two distinct ways to do this.
- Color Picker
- Named Color
Click Apply again in the Replace Colors dialog to apply the replacement to the image. You’ll notice that the replacement color now also shows up in the Job Preview.
Remove Color Replacements
If at any point you want to remove a color replacement, simply select the list entry of the replacement color you want to remove and click the Remove button. Or click Remove All to remove all color replacement entries for the current list.
Show Replacement Color Patches
Check the box Show Replacement color patches to have the RIP automatically add a color swatch with LAB color recipe above the image to easily identify the color that has been replaced and its color value later on.
Extra Channels
Allows you to map channels in the image file to output channels and set different parameters for how the channels should be treated for output. For white printing, this can be used to map a spot color channel in your image file to the white ink cartridge on the printer to print white in specific areas.
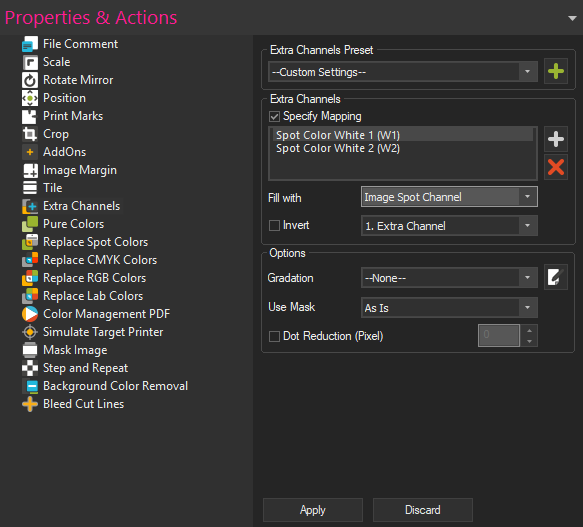
To access Extra Channels, select your image file and go to Properties > Extras Channels. Set the Preset drop down menu to Custom Settings.
The Extra Channels section within the dialog lists the available channels as they appear in the Printing Ink Assignment. If you see no channels listed here, make sure you have assigned at least one Spot-type channel such as Spot Color, Spot Color White, Finish/Varnish in Print Environment Settings > Printing Ink Assignment.
To begin assigning channel settings, check the box Specify Mapping and select one of the listed channels.
If you have multiple extra color channels defined in your printing ink assignment, you might need to manually add further ones using the Add button to the right of the colors list
To clarify, when we are talking about the Extra Channels here, we are talking about the white ink channel of the printer. Filling the white ink channel means to tell the printer where to use the white ink (We are putting printing information into the white channel).
Spot Channels in TIFF or DCS files
TIFF and DCS filetypes allow you to add additional spot color channels besides the regular CMYK or RGB. These channels are saved along with the file and recognisable by graphics programs and ErgoSoft RIPs.
If your TIFF or DCS file contains such additional Spot Channels and your Print Environment in the ErgoSoft RIP contains Spot-type channels such as Spot Color, Spot Color White, Finish/Varnish, the extra channels in the file will automatically be mapped to the extra channels in the Printing Ink Assignment in the order they appear in the file. So e.g. the fifth channel in a CMYK TIFF will automatically be assigned to Spot Color White 1 if you have it specified in your Printing Ink Assignment.
To make use of this function, simply make sure that your DCS or TIFF file contains at least one Spot Channel. Then make sure that your Ink Assignment in Print Environment Settings > Printing Ink Assignment has at least one type of Spot Color Channel assigned, such as Spot Color, Spot Color White, Finish/Varnish.
The replacement will not be visible in the JobComposer preview, but will automatically take place during printing.
Related Articles
Printing Separations and Screens
Ergosoft RIP is not only a powerful tool for direct large format inkjet printing, it can also assist in traditional screen or offset printing applications by creating color separations for film and screens. This way you can automatically create color ...Using the Ink Assignment Chart to find the correct Ink Assignment order
Setting up your Print Environments ink assignment isn't always as simple as following the order of ink in your printer. Sometimes your ink assignment should be CMYK and sometimes KCMY and when you add extra channels like Orange and Blue it can be ...Ergosoft – HP Latex 700W / 800W – White / Double Sided Printing
The goal of this document is to describe the Ergosoft workflows for white printing on the HP Latex 700W and 800W. Spot Mode This User Guide explains the preparation of job printing an image, which contains a spot white separation. Image Requirements ...Color Replacement Introduction
Color Replacement is used a variety of different applications in Digital printing. ErgoSoft RIPs offer several different ways to replace colors in your digital printing files for different applications and filetype. Be it pixel replacement in your ...Total Ink Limit
The Total Ink Limit determines the maximum ink application for mixed colors on a given printer/ink/media combination. It controls how much and how many different colors we can print on top of each other before the ink starts bleeding out. The Total ...