Preparing Images for Cut
While Ergosoft does offer some automated modes that let you cut without preparing the image beforehand with the Bleed and Cut Lines Dialog, in many cases you will want to set up your image file with cut lines first to ensure that contours are cut exactly the way you want. There are several types of lines that can be embedded into an image and used to cut using Ergosoft's flexible cut feature, and of course every graphics program will have a slightly different way of handling it. To give you and idea we’ll focus on the commonly used Adobe Illustrator, but the steps should be very similar in most graphics applications.
Common types of lines used to specify cut path are Spot Colors, Clip paths and lines of a specific color. Let’s assume you have a filled circle as your image that you want to cut out. The first step is to open your image file in the graphics program of your choice.
Create a line that follows where you want to cut, in this case another circle that has the same dimensions as the one you want to cut out. Of course your cut lines can become way more complex than that and follow just about any contour.
Now select your cut contour. From here we have different ways we can make the line ready to be cut.
You can also find a interesting videos on using cut contour in Ergosoft in our Contour Cut Playlist on Youtube
As Color
The easiest way is to specify a specific color. Since this color is part of the image, we will want a color that is not dominant and will be barely visible in the printout. Using 1% Cyan is a common choice, as it’s still detectable by the RIP when specifying the cut path, but not very visible in print. Nonetheless this color will need to be printed, so keep that in mind when using this method.
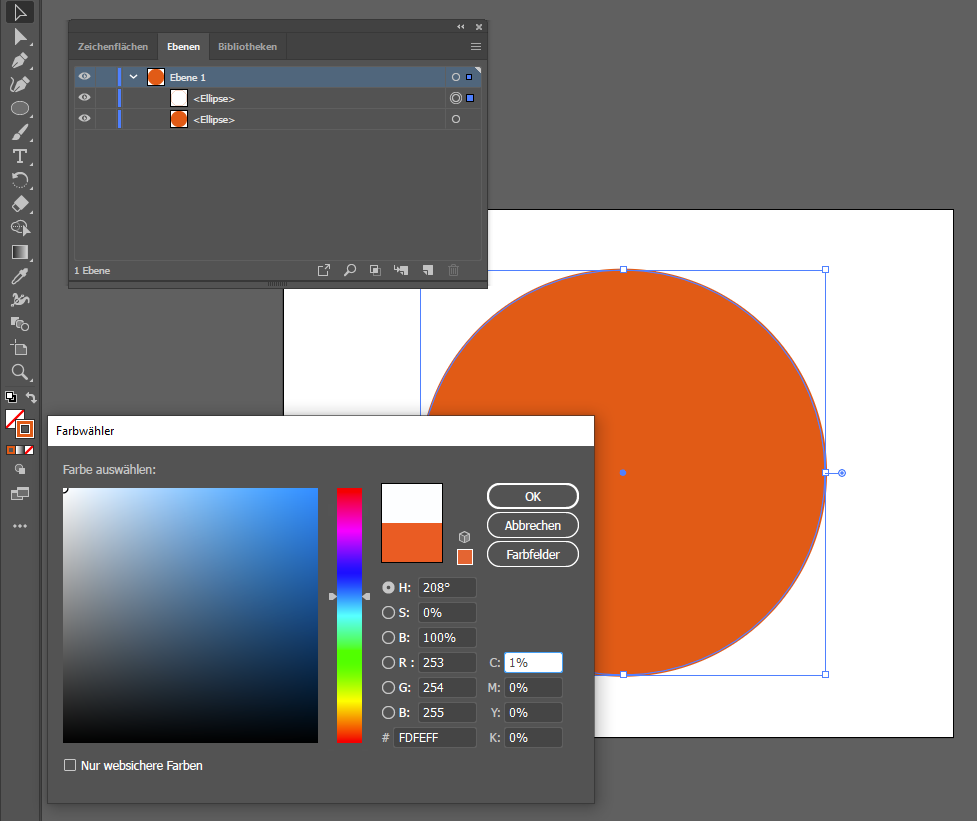
In Illustrator, simply select the path you set up to be cut and doubleclick the stroke color to open the color palette. Enter your desired stroke color in the CMYK section, here we used 1% Cyan. Confirm with Ok. The stroke will then take the defined color. You can now proceed to save the file in any format you like (Raster or Vector), but make sure to save it in CMYK if you are using a CMYK color, otherwise your color can change value due to ColorManagement and not be recognised as the color you intended for cutting and you’ll need to determine the new value to cut this path.
When saving in a vector format, also make sure to check the section at the end of this document on saving paths as wrong settings when saving cut path can lead to undesired effects such as paths being cut twice.
As Spot Color
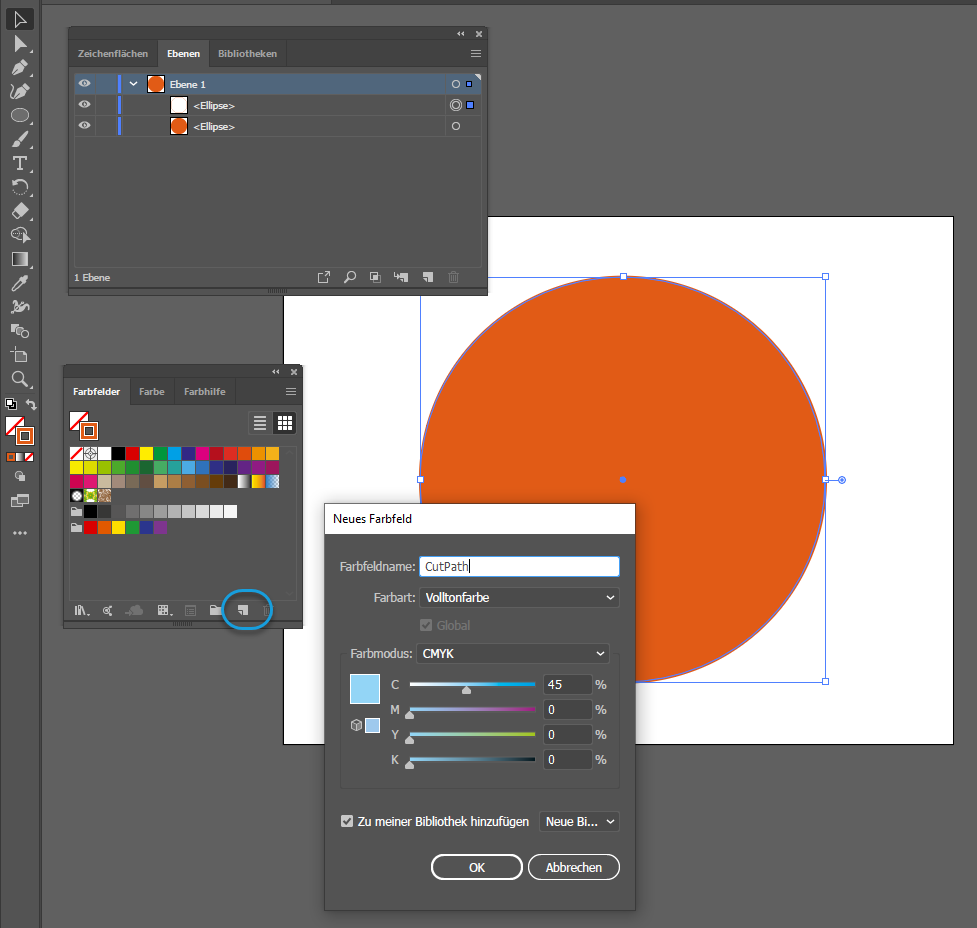
A more sophisticated and versatile way to define cut paths is using Spot Colors. By setting up the cut path in Spot Colors we can target this color specifically by its name and even have the RIP not print the Spot Color while still using it as a cut path.
Set up a cut path by following the video guide to the right or the written guide below.
In Illustrator, select the path you set up to be cut and open the Swatches palette. Use the New Swatch button to add a new color. From the Color Type dropdown, select Spot Color and enter a descriptive name (We’ll need this name later in the RIP to identify the cut path). In the example we went with CutPath as the Spot Color Name. Confirm the dialog and then make sure to apply this new color to the path in your file.
When using Spot Colors for your cut paths, you’ll need to save your files in vector formats such as eps and pdf so the Spot Colors can properly be saved. When saving in a vector format, also make sure to check the section at the end of this document on saving paths as wrong settings when saving cut path can lead to undesired effects such as paths being cut twice.
Clip Path
Another simple method is to use a Clip Path in the file while not having to print any color for the path. This will work fine if your paths are not too complex, but has some limitations because it is not possible to differentiate multiple paths in the image from each other. You can only cut all Clip Paths or none of them.
In Illustrator, simply select the path you set up to be cut and select the stroke color from the color menu in the toolbar (Don’t open the color menu, just select the stroke color). With the stroke color selected, click the «No Color» button below it to remove any color assignment from the stroke. This way we’ll still have the stroke present in the file, but it does not have a color that is printed. You can now proceed to save the file, but make sure to save it in a vector format such as eps or pdf, as the stroke information will be lost when saving to a raster file.
When saving in a vector format, also make sure to check the section at the end of this document on saving paths as wrong settings when saving cut path can lead to undesired effects such as paths being cut twice.
Saving EPS and PDF files for Cut
When saving EPS or PDF files for cut, it is important to make sure that the cut paths you set up are not accidentally converted. Some graphics programs are set to convert strokes to outlines by default. If this happens, the stroke actually becomes a shape rather than a single line, which causes issues while cutting, as any RIP will attempt to cut the outline of the shape, effectively cutting every path twice. If you are noticing your cutter going over every line 2 times, this is likely what happened. Luckily it can be avoided by changing the save settings in your graphics program before saving the file.
For Adobe Illustrator you’ll find the relevant setting in the Transparency section of the EPS or PDF saving options (The window that pops up after you’ve specified the save location and name for your file).
For EPS, click the Advanced button in the Transparency Tab. For PDF open the Advanced tab in the save options. There, make sure that «Convert all strokes to outlines» is not checked/activated. That should take care of it. Confirm and then save you file.
Related Articles
Cut
With Delta Automation, it is also possible to automatically prepare a Job for Cut by assigning a Cut Environment to the Job so the appropriate marks are printed and to configure the correct cut path so the Job can automatically go from the Print ...Cut Environments
Cut Environment can be thought of as containers that house the different settings specific to the cut device such as cutmarks, step size, pressure settings, as well as the CutQueue and the Port settings. You can also find a interesting videos on ...Introduction to Contour Cut
In ErgoSoft RIPs, contour cut integrates seamlessly into the production workflow. For Jobs intended to be Cut, the RIP automatically constrains Job space to the width of the cutter to make sure the Job fits. It reserves space around the images and ...Bleed and Cut Lines
About Bleed and Cut Lines Bleed and Cut Lines are two features intended to be used for images that will be cut out sometime after the printing process, either by machine or by hand. Bleed will add a bleed margin to the image to avoid material color ...Cutting Jobs
Cutting in the Ergosoft RIP is designed with the entire production workflow in mind. The focus was on making the entire cutting process in the RIP streamlined, from printing the Job with the JobComposers intuitive tools to sending the Job to the ...