Mimaki UCJV Series: Day & Night / Double Sided Printing
This document gives an introduction into configuring a Print Environment of a Mimaki UCJV-150/300 for a Day & Night print and using the double-sided job layout.
Add and Configure Mimaki UCJV-150/300
Retrieve print modes and dot size volumes from the printer.
Configure all print mode parameters as intended.
Configure Day & Night layer mode – Example 3 layers:
- Set layer 1 to *Color Mirrored*.
- Set intermediate layer 2 to “White*.
- Set layer 3 to *Color Mirrored*.
- Activate the Day & Night mode checkbox.

Note: The Day and Night mode option only appears, when:
- 3 or more layers are used.
- Two color layers are used.
- Color layer 1 is set to mirrored.
Create A Day & Night Job
The example uses one image each for top (day) and bottom (night) layer only. It is possible to use several images per layer, as long the position and size requirements are fulfilled.
Day Layer and White Layer
- Create a new Job while keeping the Day & Night Print Environment activated.
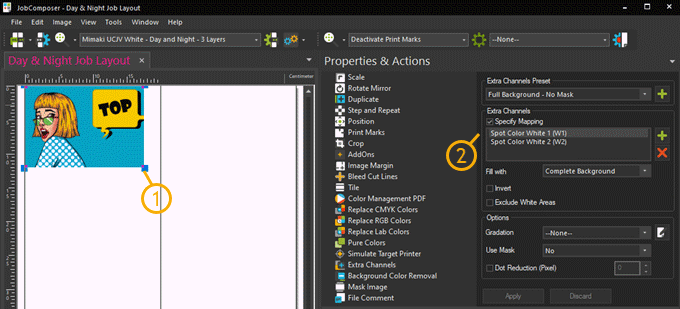
- Import the top (day) layer image (1).
- Position it top left.
- Create the intermediate white layer with Extra Channels.
- Use Complete Background.
- Use no mask.
Additional recommendations:
- Use Image Presets to automatically deactivate Print Marks (if not needed).
- Use Image Presets to autoscale images of the day and night layers to the exact same sizes.
- Use Image Property Preset *Extra Channels* to generate and assign the white layers.
Night Layer
- Import the bottom (night) layer image (1).
- Position it top right (2).

Note: Do not use any white layer generation on the Night layer. It will be ignored.
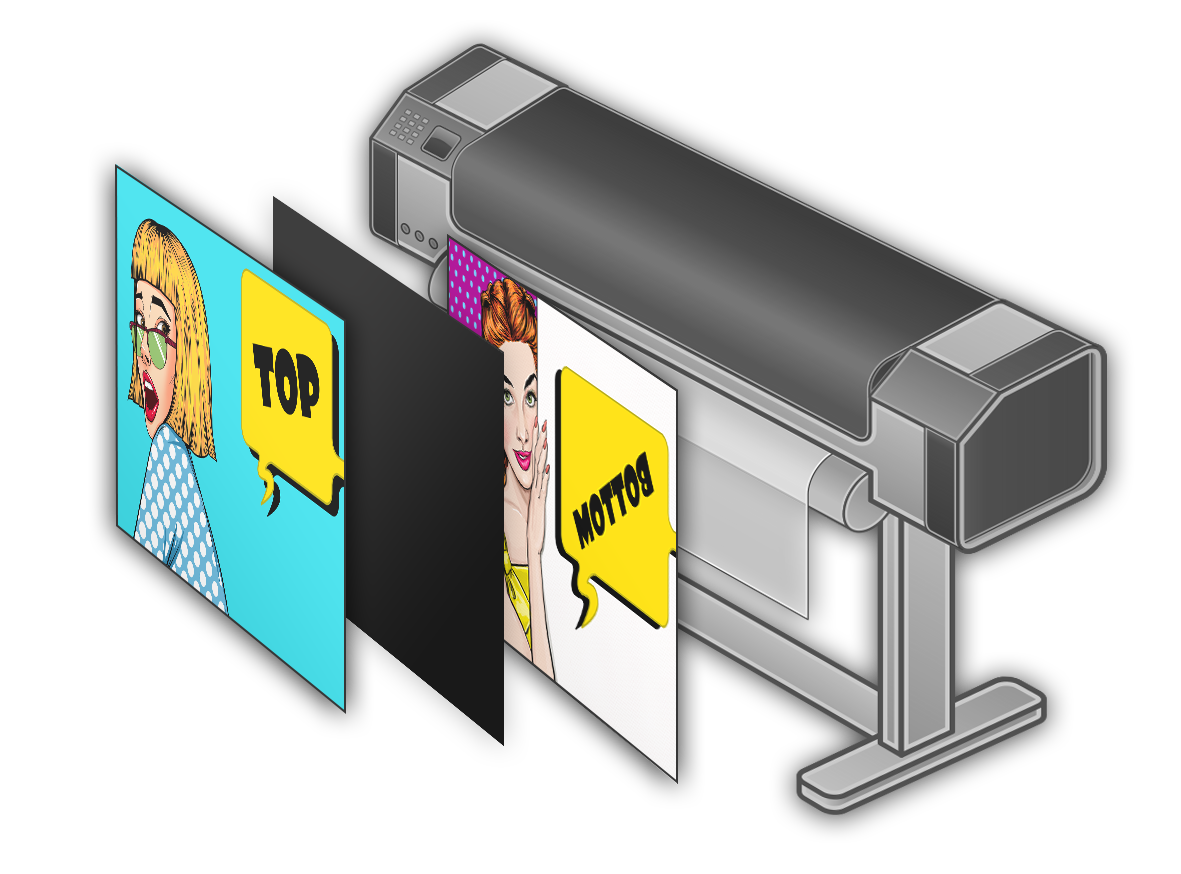
Day & Night Layer Print Order
The described example double-sided Job will lead to the following output.
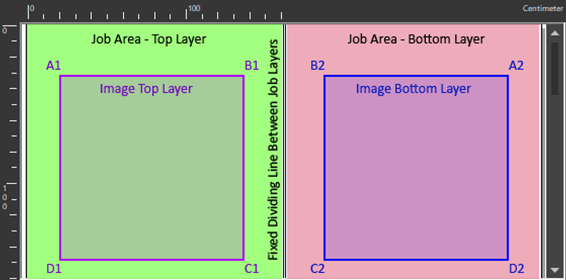
Double-Sided-Job Layout
This drawing shows the two job areas, the fixed dividing line and how the mirroring of the night job (images) is being done.
Related Articles
Ergosoft – HP Latex 700W / 800W – White / Double Sided Printing
The goal of this document is to describe the Ergosoft workflows for white printing on the HP Latex 700W and 800W. Spot Mode This User Guide explains the preparation of job printing an image, which contains a spot white separation. Image Requirements ...Roland VersaUV LEC2 Series Double Side Layer Printing
This document gives an introduction into configuring a Print Environment of an Roland VersaUV LEC2 Series to print double side layer jobs, using different images on the top layer and bottom layer areas. Add and Configure Roland VersaUV LEC2 Series ...Epson SureColor SC-S806x0 Double Side Layer Printing
This article gives an introduction into configuring a Print Environment of an Epson SureColor SC-806x0 to print double side layer jobs, using different images on the top layer and bottom layer areas. Add and Configure Epson SureColor SC-S806x0 Add a ...Printing Separations and Screens
Ergosoft RIP is not only a powerful tool for direct large format inkjet printing, it can also assist in traditional screen or offset printing applications by creating color separations for film and screens. This way you can automatically create color ...Error in printing swissQprint
Problem/Question You are using a swissQprint printer. After starting a print job from the Queue, an error message appears stating that the printer settings are missing. Naturally, you begin to wonder “Why am I getting this error message?” and “Why ...