Import Settings with the Migration Wizard
The Migration
Wizard is a tool introduced in Ergosoft 16.6 to help take over data from
Ergosoft 16/17 into the latest version or migrate installations from system to system.
This procedure
works for User Data folders from version 15 as well as 16. You can either
import data from an installation of Ergosoft 15 on the same computer, or you
can e.g. copy the User Data folder from a different computer to easily migrate
and replicate a RIP configuration.
Using the Migration Wizard
The Migration
Wizard is integrated directly into the installation routine. Start the Ergosoft
installation as usual and progress through until the User Data Folder selection
window.
When an empty
User Data folder is selected, the installation routine will show the “Show Data
Migration Options” toggle.
It’s important
to note that the toggle will not appear when there is already data in the
selected User Data folder, so make sure that the default User Data path is
empty or create a new folder and select it.
Activating this
toggle will let you select which files and settings you want to import from the
previous installation.
Possible settings that can be imported are:
- Print Environments
- Print & Cut Queues
- Profiles
- Presets
- User Levels
- HotFolder
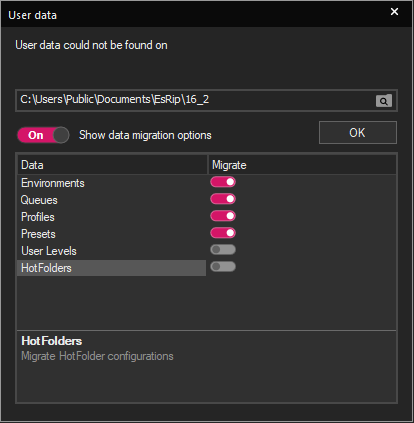
Once you have selected the data you want to migrate, confirm the User Data dialog. Another file browser window will appear where you can select your reference user data folder. Browse to the folder you want to use (Either a Version 15/16 User Data folder or a version 17 user data folder from another installation) and confirm. The settings from the reference folder will automatically be copied to your new installation.
Related Articles
Import Settings from Ergosoft 15 and 16
Updating from an earlier version of a RIP to a more recent one can seem like a daunting task, but with the following steps you can easily take over your printer configurations and settings from Ergosoft RIP 15 to Ergosoft 17. It is recommended to do ...Custom Dithering Settings
On printers with multiple dot sizes and/or multiple shades of color, which dot size gets printed and where one size transitions is an important part of the rastering process. Using small dot sizes in light tones ensures a smooth appearance in ...Image Import
Adds images from an accessible location on your Harddisk, Removable drive or network to the current Job. The import dialog also allows to set multiple parameters for the image import so you need fewer editing steps and less manual work preparing the ...First Time Setup
Setting up a RIP Software to run your digital printing production may seem like a daunting task at first, but with Ergosoft and a little help from this guide, you’ll find yourself designing, printing and cutting in no time. This guide will take you ...Changing Snapshot Settings to Improve Performance
Problem/Question My Snapshots, also known as Image Previews, are taking too long to load, what can I do to load them quicker? Solution/Workaround There are many reasons snapshots, also known as Image Previews, might load slower than expected. Here ...