Color Equalizer
The Color Equalizer offers several tools to help you adapt and harmonize the print behavior of several Print Environments and ensure matching outputs.
With the Color Equalizer, you can calculate a reference Target Density to ensure the opical density is the same across multiple Print Environments. You can also quickly copy existing target densities and profiles across multiple Print Environments, so you don’t have to manually set them in each Print Environment. You can even use a spectrophotometer to measure a printed density and have the Color Equalizer calculate a matching target density for multiple Print Environments.
To start the Color Equalizer, go to Ergosoft Control Center > Tools > Color Equalizer.
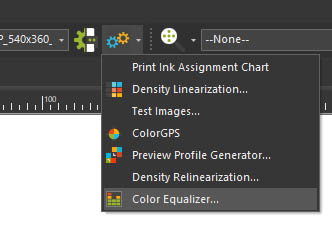
Alternatively, open the JobComposer and go to Tools > Linearization & Profiling Tools > Color Equalizer. In the main Color Equalizer window, you can select which of the features you want to use.
Note that the Measure Target Density feature is only available when starting the Color Equalizer from the JobComposer > Tools > Linearization & Profiling Tools > Color Equalizer. This is to avoid confusion because the feature requires a measuring device to be detected in the software, which can’t be done from the Control Center.
Calculate Target Density
This tool will attempt to align the optical print density of the selected Print Environment by analyzing the existing densities of all selected Print Environments and creating a new Target Density that is suitable for all of them by using the lowest available value for each channel across all densities. The tool will then automatically create copies of the selected Print Environments with the new Target Density applied, leaving the original Print Environments untouched.
This way, the printed optical density of all Print Environments/printers is aligned, so their base behavior is the same. This then allows us to use the same printer profile on all of them, ensuring that their printed color output is as close to each other as possible.
Note that this feature requires all involved Print Environments to already have density linearizations, preferably created under the same measurement conditions. Also, all involved printers need to use the same ink technology (paper pigment, dye, etc.) and media material.
While Calculate Target Density is fairly adept at creating a baseline density, how closely the behavior of the Print Environments will match depends on a range of factors, some printer/ink/media combinations can match each other closer while others may still show some differences in print behavior.
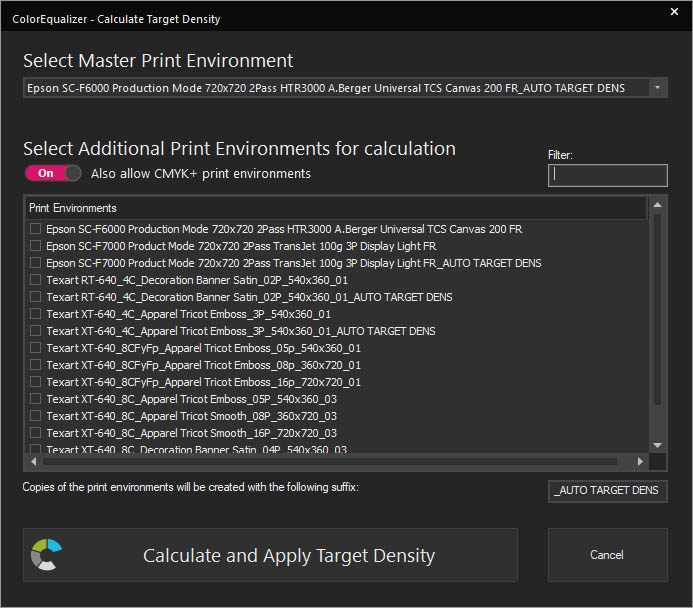
To create a new aligned Target Density, start the Calculate Target Density Tool. The tool will automatically list all suitable Print Environments (I.e. those that have a density linearization).
By default, when a CMYK Print Environment is selected as master, the list will only show CMYK Print Environments, if you want to also display Print Environments with additional colors, check Also allow CMYK+ Print Environments.
You can also filter what Print Environments are displayed by entering a filter term in the Filter textbox.
To begin with the alignment calculation, select a Master Print Environment from the dropdown menu at the top of the dialog. The Master Print Environment serves as reference for the aligned density by applying its Dot Gain to all selected Print Environments (Note that color channels that are not present in the Master Print Environment will be ignored by the Target Density Calculation).
Then, check the boxes next to the Print Environments you want to align to each other.
You can use the textbox on the bottom right to specify a suffix to be added to the aligned Print Environment copies. By default, this will be _equalized.
When you are satisfied with the selection, click Calculate and Apply Target Density. This will begin the Target density calculation. Once it’s finished, you will be returned to the Color Equalizer main screen.
You will find the new Print Environments with the aligned density in your regular Print Environments list. They will have the same name as the original Print Environments but with the suffix _equalized added at the end (Or your custom suffix of course).
From here you can just use your new Target Density, or copy it to other Print Environments by using Copy Target Density.
Copy Target Density
This tool lets you automatically copy an existing Target Density to one or more Print Environments (E.g a Target Density previously created with Calculate Target Density or an external tool). Copy Target Density will create copies of the selected Print Environments and embed the Target Density from the selected source Print Environment into the copies, leaving the original Print Environments untouched.
Note that this feature requires all involved Print Environments to already have density linearizations, preferably created under the same measurement conditions (This way the tool knows if the Print Environments are suitable for the Target Density). Also, all involved printers need to use the same ink technology (paper pigment, dye, etc.) and media material.
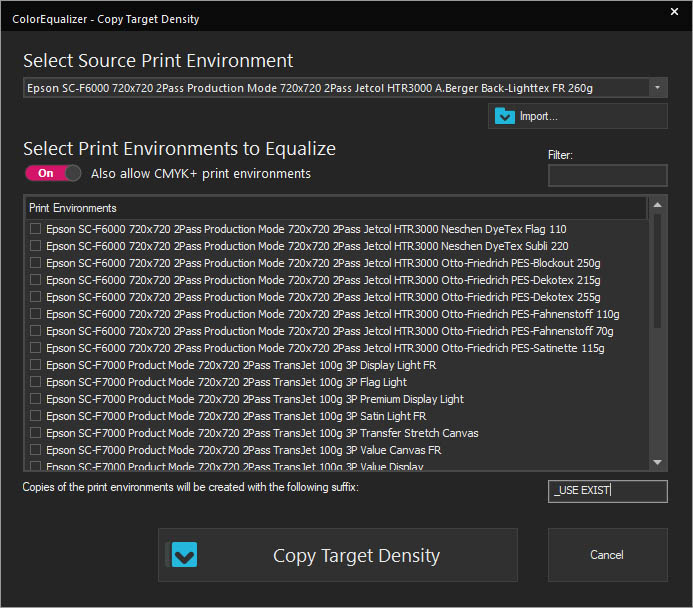
To copy a Target Density, start the Copy Target Density tool. The tool will automatically list all suitable Print Environments (I.e. those that have a density linearization and that can achieve the maximum density of the Source Print Environment).
By default, when a CMYK Print Environment is selected as master, the list will only show CMYK Print Environments, if you want to also display Print Environments with additional colors, check Also allow CMYK+ Print Environments.
You can also filter what Print Environments are displayed by entering a filter term in the Filter textbox.
To begin with the copy process, select a Source Print Environment from the dropdown menu at the top of the dialog. The Copy Target Density tool will copy the Target Density from the Source Print Environment to all selected Print Environments.
Then, check the boxes next to the Print Environments you want to copy the Target Density to.
You can use the textbox on the bottom right to specify a suffix to be added to the aligned Print Environment copies. By default, this will be _equalized.
When you are satisfied with the selection, click Copy Target Density. This will begin the copy process. Once it’s finished, you will be returned to the Color Equalizer main screen.
You will find the new Print Environments with copied density in your regular Print Environments list. They will have the same name as the original Print Environments but with the suffix _equalized added at the end (Or your custom suffix of course).
Copy Printer Profile
This tool lets you automatically copy an existing printer profile and Total Ink Limit to one or more Print Environments that use the same Target Density. Copy Printer Profile will create copies of the selected Print Environments and embed the printer profile and Total Ink Limit from the selected Source Print Environment into the copies, leaving the original Print Environments untouched.
Note that this feature requires all involved Print Environments to use the same Target Density. You can apply the same Target Density to multiple Print Environments either by using the Calculate Target Density or the Copy Target Density Tools. Also, all involved printers need to use the same ink technology (paper pigment, dye, etc.) and media material.
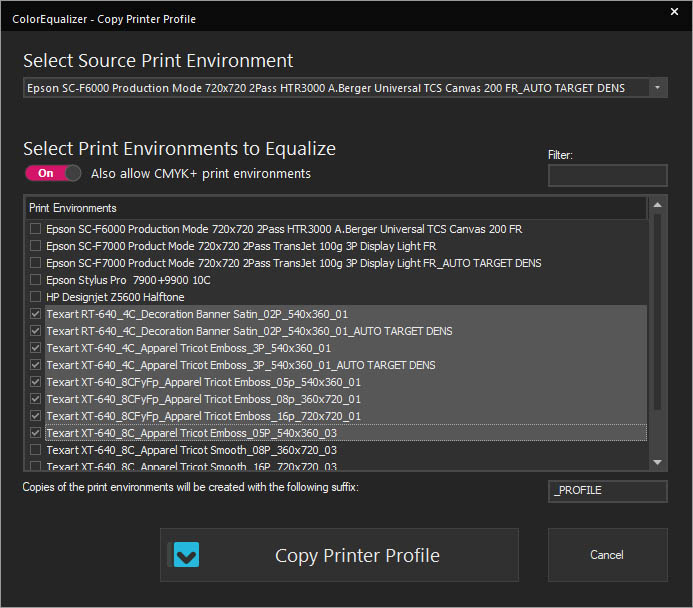
To copy a Printer Profile, start the Copy Print Profile tool. The tool will automatically list all suitable Print Environments (I.e. those that have a density linearization and that can achieve the maximum density of the source Print Environment).
By default, when a CMYK Print Environment is selected as master, the list will only show CMYK Print Environments, if you want to also display Print Environments with additional colors, check Also allow CMYK+ Print Environments.
You can also filter what Print Environments are displayed by entering a filter term in the Filter textbox.
To begin with the copy process, select a Source Print Environment from the dropdown menu at the top of the dialog. The Copy Printer Profile tool will copy the Printer Profile from the Source Print Environment to all selected Print Environments. It will also set the same Total Ink Limit used in the Source Print Environment.
Then, check the boxes next to the Print Environments you want to copy the Printer Profile to.
You can use the textbox on the bottom right to specify a suffix to be added to the aligned Print Environment copies. By default, this will be _equalized.
When you are satisfied with the selection, click Copy Printer Profile. This will begin the copy process. Once it’s finished, you will be returned to the Color Equalizer main screen.
You will find the new Print Environments with copied Printer Profile and set Total Ink Limit in your regular Print Environments list. They will have the same name as the original Print Environments but with the suffix _equalized added at the end (Or your custom suffix of course).
Measure Target Density
This tool lets you create a Target Density by measuring the behavior of an established workflow. E.g. if you have a print setup using a third party software solution and want to mimic this software’s behavior, you can use Measure Target Density to create a Target Density in Ergosoft RIP that matches that software’s optical density.
To achieve this, Measure Target Density generates a chart in TIFF Format (CMYK++) that you can print out using your existing solution. You can then measure this chart in Measure Target Density. Measure Target Density will generate a Target Density that matches the measured ink application behavior, effectively matching the external solution. This Target Density can of course be used together with a color profile and/or be redistributed to other Print Environments using the other Color Equalizer tools.
Note that this feature generates a TIFF chart that needs to be printed using the print workflow and density limitation that should be replicated, but without Color Management.
Additional color channels need to be assigned in the Print Environment for Ink Assignment before the chart is generated and match the ones in the reference print workflow.
Also, all involved printers need to use the same ink technology (paper pigment, dye, etc.) and media material.
To generate a Target Density Chart, start the Measure Target Density tool. The dropdown-menu at the top of the dialog will show a list of Target Charts that are available to measure (This will be empty by default). Click Add New to create a new chart. This opens a new dialog where you can customize the chart.
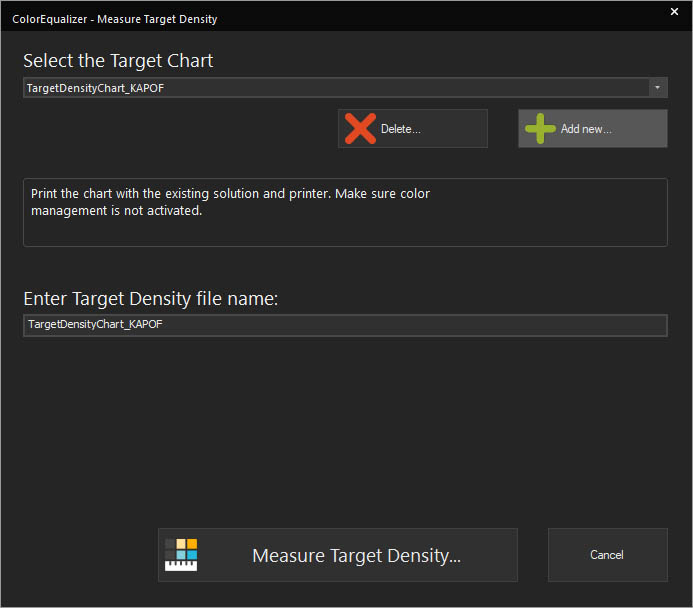
Select the Print Environment to use as a base from the dropdown menu Select Print Environment for Ink Assignment. This dictates what colors will be in the chart.
Use Select Chart Geometry to select a suitable chart layout for your measuring device. If you have already detected your measuring device, the dropdown-menu should pre-filter and only show suitable geometries. If you want to see all available Geometries, check the box Show All.

Use Number of Patches per Ink to set how many patches of each color should be included in the chart. More patches mean a more accurate measurement/density. Chart Width, Chart Height, Chart Name are automatically calculated to show you the size of the chart and the name to identify it.
When you are satisfied with the settings, click Create Target Chart Files. Select a save location for your density chart file and confirm. This will return you to the Measure Target Density window.
Take the TIFF Chart file and print it using the workflow you want to replicate. Remember: No color management, as that would falsify the print and the measurement results.
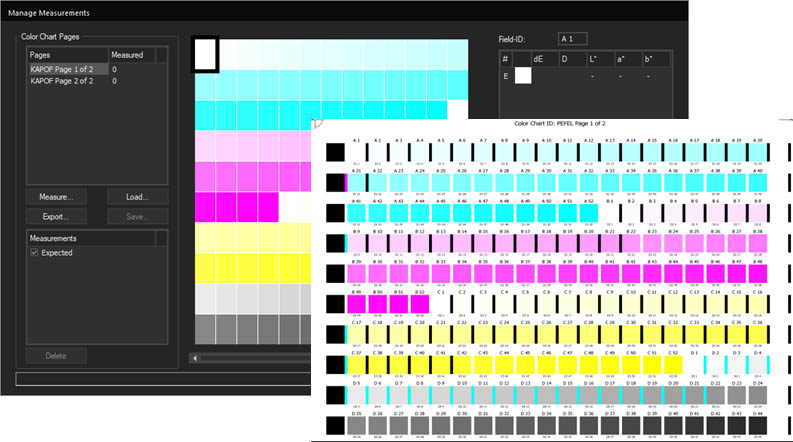
Once the chart is printed, return to the Measure Target Density window. Make sure the correct Target Chart is selected in the dropdown at the top and click Measure Target Density... This opens the standard Manage Measurement dialog (For more information on conducting measurements, see the Output Calibration chapter). Measure the chart completely and finally confirm with Ok.
After confirming, Measure Target Density will use the measurement results to create a Target Density based on the measurement results. Specify a save location for the Target Density where the Target Density file itself will be stored.
After the Target Density has been calculated, you can Use the Copy Target Density tool to import it into a reference Print Environment and copy it of other Print Environments. Alternatively, you can also close the Color Equalizer and import the density through Print Environment Settings > Quality.
Related Articles
Spot Color Replacement Preset no longer works after Ergosoft update
Problem/Question After updating Ergosoft, existing Spot Color Replacement Presets may no longer work as expected. You may notice that spot colors are not replaced correctly, even though the preset configuration itself appears unchanged. ...Introduction to Color Management System (CMS / CMM) and ICC Profiles
Color Management System / Module (CMS/CMM) In digital printing combining RGB (matrix-based) or CMYK (LUT based) source ICC profiles with CMYK (LUT based) or RGB (LUT-based) destination ICC profiles leads to the most common profile chain for the ...Color Spaces
Basics In technical terms, color is defined as a spectrum of wavelength that is reflected from a given object when it is hit by (white) light. White light itself is the combination of all wavelengths of the (visible) spectrum. To express this ...Measure Color
With Measure Colors, Ergosoft lets you use your Spectrophotometer to conduct spot measurements of colors and displays their color value. This can be useful if you want to doublecheck the numerical values of a printed color, or pick up a color value ...Generate Color Books
Generate Color Books lets you create a color chart in either Lab or RGB color and to customize the chart in color tones, color variance, dimensions and color management used. You can even generate aco and swb Color Books for use in Photoshop and ...