Pixel Color Replacement
Probably the method most people think about first when thinking about color replacement. Pixel color replacement uses pixel color values to identify and replace color in an image either by selecting it from the image itself, or by specifying a color value in CMYK or RGB beforehand that the RIP will then identify and replace when it appears in an image file.
Due to technical limitations in PostScript Color Management, Pixel Color Replacement is only fully supported for raster file types (tiff, jpg, png, bmp), but not for PostScript based filetypes such as PS and EPS. Starting in Version 15 there is pixel color replacement support for PDF files.
There are 3 distinct methods to use Pixel color replacement, depending on when and how you want to use the function: In Properties & Actions (Image specific), in Application Defaults (Global across the entire ErgoSoft RIP) and in Presets (Whenever that Preset is active).
Pixel Color Replacement in Properties & Actions
To apply Pixel Color Replacement to a specific image, import the image into the JobComposer and select it. From the Properties & Actions pane, select Replace Colors.
For PDF files, you’ll see 3 different options: Replace CMYK Colors, Replace RGB Colors, Replace LAB colors, simply select the one that matches the color space of your image.
Color Replacement Preset
To customize the Color Replacement settings, select -Custom Settings- and adapt the settings for the function as desired. You can also go directly to editing the settings, the Preset will automatically switch to -Custom Settings-.
Once you are done with the settings, you can either leave the Color Replacement Preset setting at the top of the dialog on Custom Settings, or you can click the Add button to create a new Color Replacement Preset. This will save the current settings as a Preset and allow you to apply these exact settings to any image with just two clicks by selecting the Preset from the dropdown.
You can also change the Preset setting to None at any time to remove any effects of the dialog and return the image to its original state.
Selecting the color to replace
You’ll notice the initially empty list section at the center of dialog. Press the Show Colors button. The list will now populate with the most commonly appearing colors in the image.
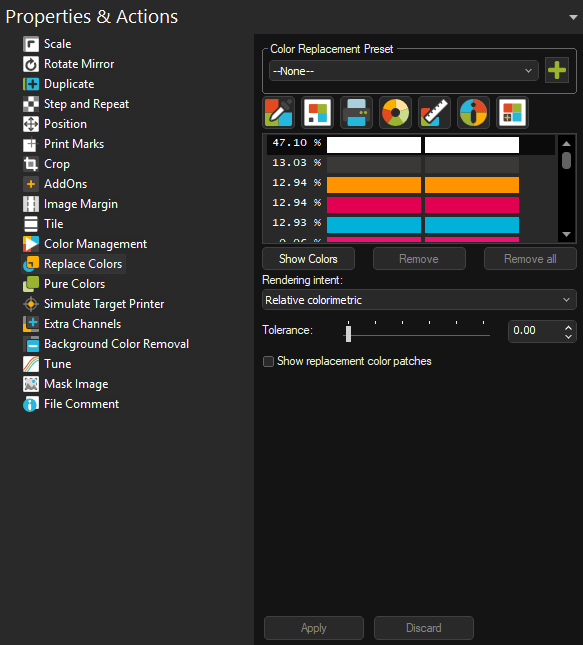
You’ll see two columns of identical color patches at first. The left column represents the original color as it appears in the image, the right represents the replacement color i.e. output color. Since we haven’t defined any replacement colors yet, both columns will look the same.
Note that photos will contain a huge amount of colors making up subtle shifts in tone that are not «one color». Many perceived colors like skin tones might not show up in the list at all, since they are made lots of different colors that each appear very little in the image. If you want to replace multiple similar tones together, you can use the Tolerance slider towards the bottom of the dialog to increase the range of when values are still considered the same color.
Select the first color that you would like to replace from the list.
Selecting the Replacement Color
Now, we go on to select the color that should be printed instead. There are multiple different ways how this can be done.
Color Picker
Lets you visually select or numerically specify a replacement color.
With the color you want to replace selected, click the Color Picker button above the color list to bring up the dialog. Using the Color Picker, you can:
Select a color visually using the color field to the left: Shift hues by using the vertical gradient in the center, and adjust lightness and contrast with the large area on the left. You can also switch between Hue, Saturation and Brightness cube modes with the H, S and B buttons to the right of the color picking area.
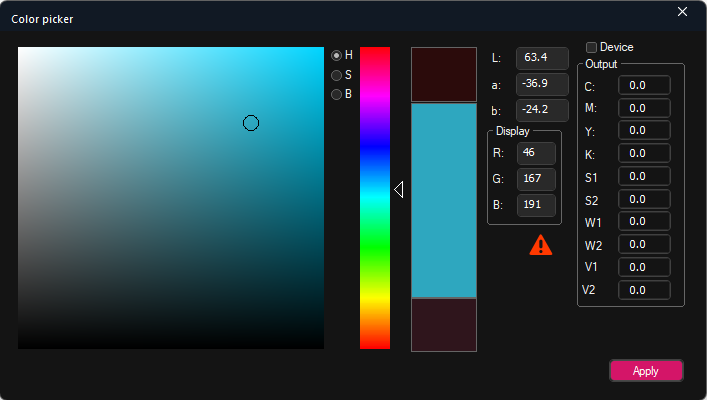
If the replacement color you selected is outside the printable gamut of the current profile, you will see a red warning triangle displayed below the “Display” area.
If you would like to see the outside of gamut colors directly represented in the color picking area, toggle Show outside of gamut colors. This will show all colors outside of the currently printable gamut in a color (Default bright green, but adjustable with the small color picker button).
Specify a Replacement value through LAB or RGB: This replacement value will be treated as if it was in the original image, i.e. it will go through Color Management just the same as the other colors and will therefore shift from the specified value to a different one.
Specify an Output Value in device colors: By activating Device and entering a value directly in the device colors, you specify the actual output value of the color. The replacement color will not be color managed and will be output exactly with the values you specify here.
Once you have chosen your replacement color, click the Apply button to take it over. You’ll see that the color in the right column of the color list has changed to reflect the new output color.
Use the Rendering Intent dropdown menu to specify what rendering intent should be applied if the replacement color ends up in outside the printers gamut.
Click Apply again in the Replace Colors dialog to apply the replacement to the image. You’ll notice that the replacement color now also shows up in the Job Preview.
Swatchbook
The Swatchbook is a library of colors that you can use across the entire ErgoSoft RIP. It saves colors in the versatile LAB format, allowing you to use them universally, regardless of output color space. As long as the output color management settings remain the same, the output will be the same regardless of where you use a color swatch.
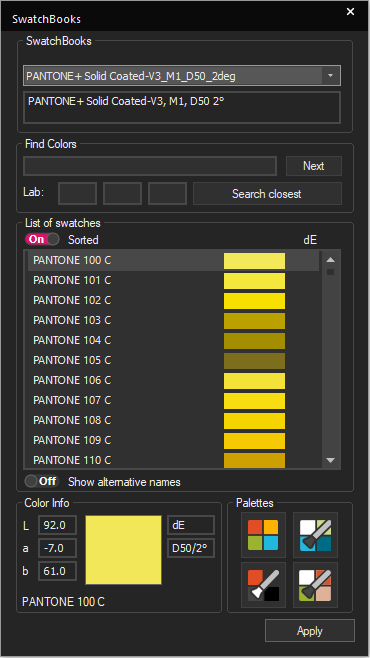
With the color you want to replace selected, click the Swatchbook button above the color list to bring up the dialog.
From the Swatchbook dialog, select any color from one of your Swatchbooks and click the Apply button to take it over. You’ll see that the color in the right column of the color list has changed to reflect the new output color.
Use the Rendering Intent dropdown menu to specify what rendering intent should be applied if the replacement color ends up in outside the printers gamut.
Click Apply again in the Replace Colors dialog to apply the replacement to the image. You’ll notice that the replacement color now also shows up in the Job Preview.
Named Color
A Named Color profile contains a list of colors with a specific output recipe defined by the user. These are usually used for automatic color replacement, but you can also access the named colors list and use these output values for regular color replacement.
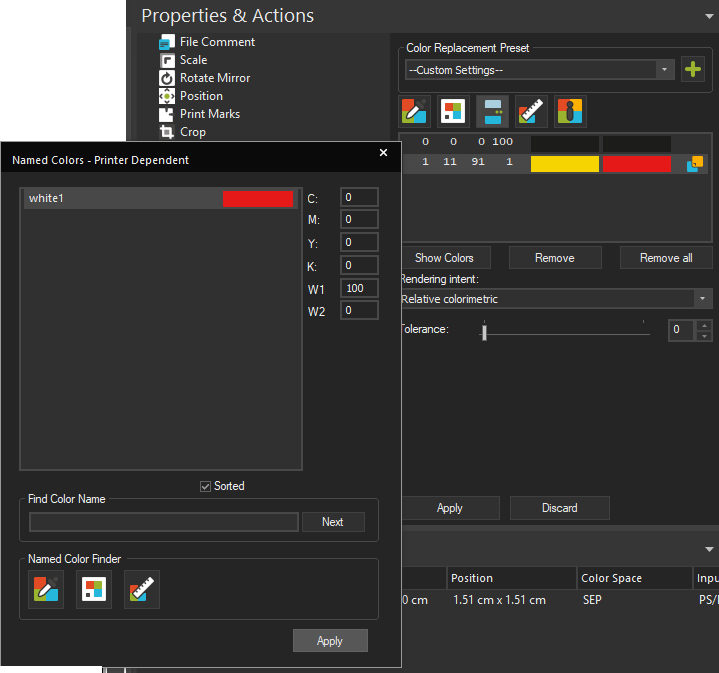
With the color you want to replace selected, click the Named Colors button above the color list to bring up the Named Color list of the currently active Print Environment.
Select the color with the output recipe you want to use and click apply to take it over into Color Replacement.
Click Apply again in the Replace Colors dialog to apply the replacement to the image. You’ll notice that the replacement color now also shows up in the Job Preview.
Color Wheel
The color wheel lets you create harmonious color combinations by selecting a base color and a color harmony mode (Analogous, Complementary, Rainbow, Triadic, Monochromatic, Square, Split Complementary, Shade).
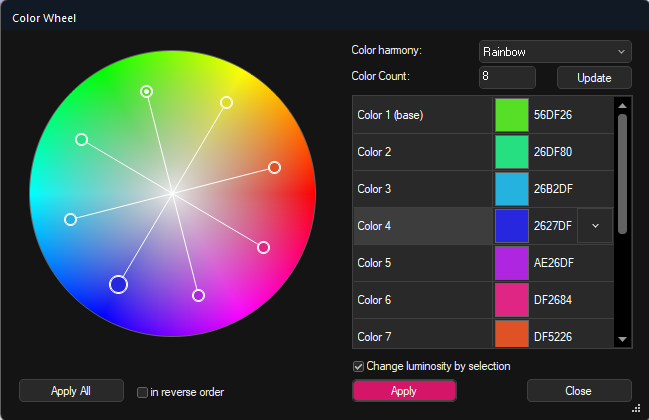
The Color Wheel will use the select color harmony mode to suggest harmonious colors to the base color that you can then use for color replacement.
Color Count sets how many colors should be generated. Click Update to update the color list after changing this setting.
With the color you want to replace selected, select a color from the harmonious color list and click Apply to use it as the replacement color.
Clicking Apply All will apply all the harmonious colors from the color wheel list to the colors in your color replacement list in order from top to bottom.
Measure Color
Allows you to measure a color using a spectrophotometer that you want to print. The ErgoSoft RIP will then try to emulate this color mixture. The color is measured and saved as an RGB value. To print, this value is transitioned to the printers color space through the regular color management to reach the proper output color.
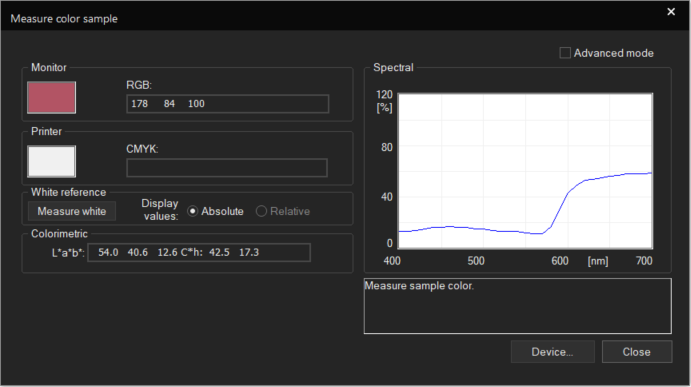
With the color you want to replace selected, click the Measure Color button above the color list to bring up the dialog. If you have not preselected and calibrated your Measuring device in Tools > Application Defaults > Spectrophotometer, a prompt will come up asking you to detect your device and then calibrate it. Select your device and then follow your regular white calibration procedure to get the measuring device ready for use.
With the measuring device ready, you’ll be taken to the measure dialog. You can now simply use the measuring device on any colored surface to measure a color and have it automatically taken over into both the measure color dialog and set as the replacement color.
Measuring again will replace the current color directly, allowing you to correct in case of mismeasurements.
Besides the measured RGB values at the top, the Measure Color dialog will also display LAB values and Spectral values for the color, allowing you to verify the values of your colors.
Once you are satisfied, close the measurement window by clicking Close.
Color Info
The Color Info window isn’t actually for color selection, but instead it will display information about a selected color.
Click the Color Info button above the color list to bring up the dialog.
With the Color Info window open, select one of the colors in your Color Replacement list. The Color Info dialog will show the original pixel value at the top under Pixel Value. In the lower segment the dialog will show the transitional LAB value for the color and the CMYK value that will be used to print the color.
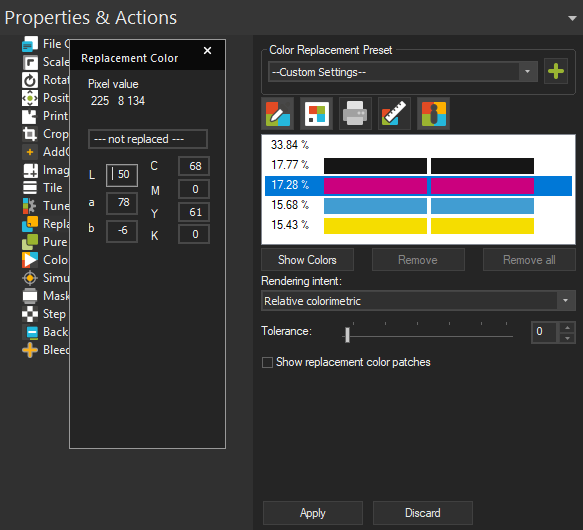
You can also inspect colors from a selected image by picking the color from the selection window. With the Color Info window open, hover over the preview in the Selection window and the cursor will change to a color picker icon. Click to select a color and Color Info will display the original pixel value, the transitional LAB value and the output CMYK value of the color you selected.
Add to Swatchbook…
This button will add the selected color from your color replacement list to a Swatchbook in this Ergosoft installation. Select a color from your color replacement list and click the Add to Swatchbook… button.
From the appearing dialog box, select the Swatchbook the color should be added to. You can also enter a new Swatchbook name to create a new Swatchbook. Select if you want the base or the replacement color to be added and confirm with Ok.
Print Similar Colors
Lets you print variations on the selected color to find the perfect color match for your purpose.

Select the color from the replacement color list that you want to generate variations for, then click the Print similar Colors button. In the dialog, configure the variations you want to be generated.
Color Variations means which color channels should be changed, e.g. selecting on Cyan will only generate variations with different amounts of cyan color.
Number of colors sets how many colors should be generated
Color Steps sets how large the steps between the colors should be, large will make the colors more different from each other, fine will make the variations closer. You can customize the steps using the Settings button.
Maximum width determines the maximum width of the color chart.
When you are ready, click either Create Job to create a new Job with the generated chart or Add to Job to add the chart to the existing Job.
Remove Color Replacements
If at any point you want to remove a color replacement, simply select the list entry of the replacement color you want to remove and click the Remove button. Or click Remove All the remove all color replacement entries for the current list.
Show Replacement Color Patches
Check the box Show Replacement color patches to have the RIP automatically add a color swatch with LAB color recipe above the image to easily identify the color that has been replaced and its color value later on.
Pixel Color Replacement in Application Defaults
The Color Replacement options in Tools > Application Defaults let you set global replacement parameters that are automatically applied to all suitable images that are imported into the JobComposer.
To allow for the greatest flexibility, the Color Replacement options in Application Defaults are split into different dialogs for each color space and color replacement type.
For Pixel Color Replacement, go to Tools > Application Defaults > Color Replacement and access RGB, CMYK, Gray or LAB. Each of these dialogs specifies the original color to replace in the title color space (So use the RGB dialog if you have an RGB image, and so on).
Selecting the color to replace
By default you will have one entry/color already defined, represented by the white/white columns in the color list.
To the left side of the dialog you can specify the color that is to be replaced. Select the White/White list entry and enter a color mix in your respective color mode to the left. You’ll notice that the left column in the list changes from white to the color you entered.
Selecting the Replacement Color
With the list entry still selected, use one of the Icons at the top of the list to specify what your the color on the left should be replaced with.
Pixel Color Replacement in Presets
The Color Replacement options in Image Presets let you set replacement parameters that are automatically applied to all suitable images that are imported into the JobComposer as long as the Preset is active, or when the Preset is manually assigned to an image through Right Click > Image Preset > Your Image Preset name.
To create a new Image Preset with Color Replacement, either click the New Image Preset button in the Toolbar, or go to Tools > Edit Preset > Composite Presets > Image Preset and click the New button.
To allow for the greatest flexibility, the Color Replacement options in Image Presets are split into different dialogs for each color space and color replacement type.
For Pixel Color Replacement, go to Image Preset > Color Replacement and access RGB, CMYK, Gray or LAB. Each of these dialogs specifies the original color to replace in the title color space (So use the RGB dialog if you have an RGB image, and so on).
Legacy Pixel Color Replacement in EPS and PDF files
The color replacement options described above work for raster image file types such as jpg, png, tiff as well as for PDF files. However they are currently not compatible with EPS files due to changes in the Postscript Interpreter that were introduced between versions 12 and 2008.
For EPS files (and PDF), ErgoSoft RIPs offer the function of Legacy Pixel color replacement by setting the software to use an older Form of Postscript ColorManagement.
By reverting to the older Postscript ColorManagement, you’ll be able to use Replace Colors on EPS and PDF files as it was in earlier versions of the ErgoSoft RIP, at the cost of having less control over the intricacies of PostScript ColorManagement.
These instructions focus on enabling the Legacy feature for EPS and PDF files. For instructions on how to actually use the Legacy Pixel Color Replacement, see the Pixel Color Replacement in Properties & Actions at the beginning of this document.
Legacy Pixel Color Replacement for EPS Files
The option can be activated in two ways, either as a general setting for the RIP so it available by default, or image specific so it is only activated for a specific image.
Global Setting: To enable Legacy Pixel Color Replacement for EPS files globally in the ErgoSoft RIP, go to Tools > Application Defaults > Color Management > Postscript/EPS and turn off the checkbox for Use Postscript/PDF Interpreter Color Management.
Starting with the next Job you open, when you import an EPS file and select it, you’ll have the option Replace Color available in your Properties & Actions bar.
Image Specific: To enable Legacy Pixel Color Replacement for a specific EPS file in a Job, select the EPS file and go to Properties & Actions > Color Management. From there, select Edit. In the EPS Color Management dialog that opens, turn off the checkbox for Use Postscript/PDF Interpreter Color Management.
Confirm with Ok. For the selected image, you should now have the option Replace Color available in your Properties & Actions bar.
Legacy Pixel Color Replacement for PDF files
The option can be activated in two ways, either as a general setting for the RIP so it available by default, or image specific so it is only activated for a specific image.
Global Setting: To enable Legacy Pixel Color Replacement for EPS files globally in the ErgoSoft RIP, first go to Tools > Application Defaults > PostScript/PDF Parameters. In the dropdown Interpreter for PDF Rendering, select Legacy.
Next, go to Tools > Application Defaults > Color Management > Postscript/EPS and turn off the checkbox for Use Postscript/PDF Interpreter Color Management.
Confirm everything with OK.
Starting with the next Job you open, when you import a PDF file and select it, you’ll have the option Replace Color available in your Properties & Actions bar.
Image Specific: To enable Legacy Pixel Color Replacement for a specific PDF file in a Job, select the PDF file, Right Click on it and Select Renderer Options. In the dropdown Interpreter for PDF Rendering, select Legacy.
Next, go to Properties & Actions > Color Management. From there, select Edit. In the EPS Color Management dialog that opens, turn off the checkbox for Use Postscript/PDF Interpreter Color Management.
Confirm with Ok. For the selected image, you should now have the option Replace Color available in your Properties & Actions bar.
Related Articles
Color Replacement Introduction
Color Replacement is used a variety of different applications in Digital printing. ErgoSoft RIPs offer several different ways to replace colors in your digital printing files for different applications and filetype. Be it pixel replacement in your ...Spot Color Replacement Preset no longer works after Ergosoft update
Problem/Question After updating Ergosoft, existing Spot Color Replacement Presets may no longer work as expected. You may notice that spot colors are not replaced correctly, even though the preset configuration itself appears unchanged. ...Color Spaces
Basics In technical terms, color is defined as a spectrum of wavelength that is reflected from a given object when it is hit by (white) light. White light itself is the combination of all wavelengths of the (visible) spectrum. To express this ...Input Color Management
Introduction The ErgoSoft RIPs provide several tools for color management. These tools can be separated into two distinct parts of the color management workflow: tools that affect input colors and tools for output control. Input Color Management ...Introduction to Color Management System (CMS / CMM) and ICC Profiles
Color Management System / Module (CMS/CMM) In digital printing combining RGB (matrix-based) or CMYK (LUT based) source ICC profiles with CMYK (LUT based) or RGB (LUT-based) destination ICC profiles leads to the most common profile chain for the ...