HotFolder
The Ergosoft HotFolder is a powerful tool for print process automation and batch processing. Automatically create and print standardized print jobs, simply by moving image files into a folder, the HotFolder application will do the rest!
The HotFolder lets you define parameters for printing such as Printer/Print Environment, output scale, image presets, cut settings, etc. that will be used. Specify a monitored folder on the harddrive and whenever an image file is placed into the monitored folder it is automatically picked up and processed according to the specified parameters. Once an image is placed into the surveyed folder, the HotFolder creates a printjob from the image files and passes it on to the PrintQueue for printing.
If you have a large number of files that all need to be printed the same way and arranged/nested in a job, simply drop them into the surveyed folder and let the HotFolder do the rest!
Need several sets of settings for different types of jobs or different printers? No problem, just create multiple surveyed folders, each with its own set of print parameters!
You can also find guides and valuable tips on the HotFolder in our Ergosoft HotFolder Youtube Playlist.
Configuring the HotFolder
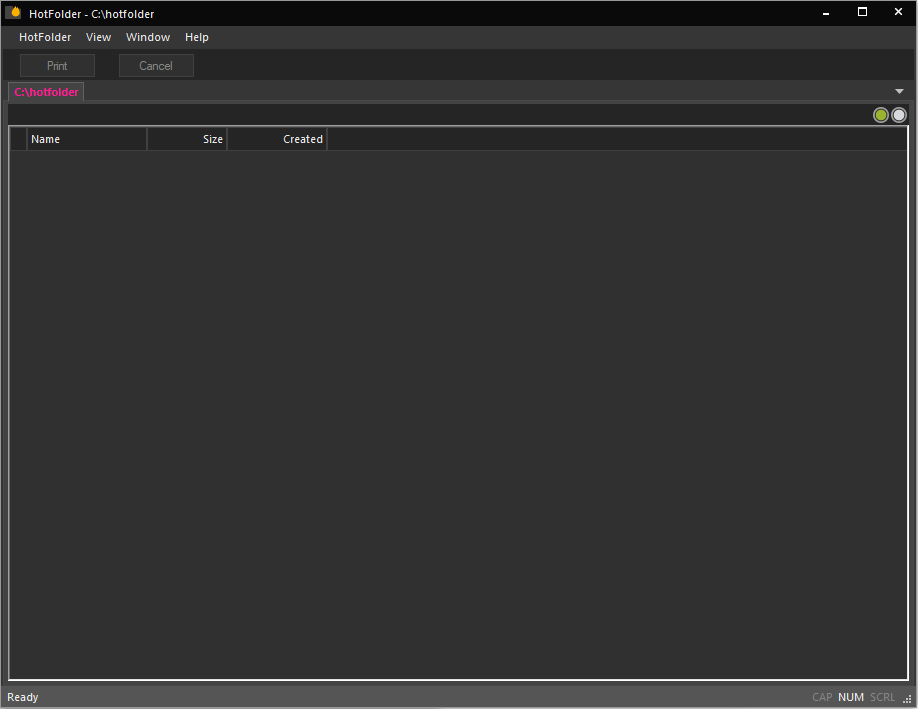
To set up a new surveyed folder, start the HotFolder Application from Control Center > Home > HotFolder. This will bring up the main HotFolder window. Alternatively, you can also start the HotFolder with Start/Programs/Ergosoft 17/HotFolder.
Note that you can have as many different HotFolders as you like to cover a range of different settings and run them at the same time. Just make sure that each one uses a different surveyed folder. Multiple HotFolders may also use the same Print Environment and PrintQueue.
In Filemenu > HotFolder you can also configure the start mode for the HotFolder. The following modes are available:
- Start as Tray Icon: The HotFolder will by default start minimized to the system tray.
- Close Button minimizes to Taskbar symbol: Pressing the close button (x) will not close the HotFolder application but instead minimizes it to the System Tray.
With the main HotFolder window before you, click HotFolder > New to bring up the HotFolder configuration window.
General
First, specify the folder that should be monitored by the application. Click browse to navigate to the folder you want to use and confirm with Select Folder. This is the folder where you’ll place images for processing.

In HotFolder User Friendly Name, you may specify a name for this surveyed folder that makes it more easily identifiable. If you leave this blank, the HotFolder will simply be identified by it’s file path (e.g. C:/HotFolder).
Processing specifies what happens with image files in the HotFolder after they have been processed:
- Always Delete Files deletes the image files once the HotFolder has attempted to process them.
- Always Keep Files retains the files in the HotFolder but moves them to the $completed subdirectory of the surveyed Folder.
- Keep files only if an error occurred will delete the image files in the surveyed folder, unless an error occurred during processing. In that case the files are moved into the $Error subdirectory.
In Print Environment, select the Print Environment to be used for this surveyed folder. All images placed into the surveyed folder will be printed with this Print Environment, so this determines what printer, port, color profile etc. are used for the printout.
File Filter lets you specifically exclude some file types from the HotFolder processing so they are ignored. For example if you activate the File Filter by checking the box and entering *.bmp will cause bmp files to not be processed and ignored by the HotFolder application.
Job Settings
At the top of the dialog we will specify the Media Size for the HotFolder. This determines how many images will be able to be placed next to each other, etc. Note that the media size also depends on the Print Environment you use. You will not be able to use a media size larger than the maximum size of the printer.
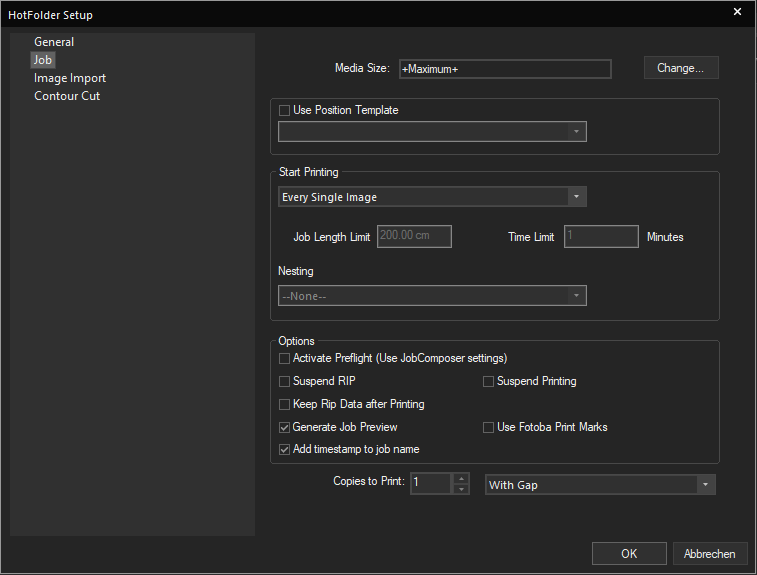
You can also set a default Position Template to be used for this HotFolder (This is optional) by selecting one of the Position Templates from the dropdown menu. If a Position Template is active, images placed in the surveyed folder are added into the image placeholders until the template is filled, then the job is sent to print (You may also force printing a partial job by clicking the Print button in the main HotFolder window).
Nesting lets you select a Nesting mode to use with Hotfolder Jobs. Because nesting requires moe than one image, this setting is only available when using either “Print folder dropped on windows as one job” or one of the conditional triggers that collect multiple images. The selected Nesting mode is automatically applied to the images in the job.
Print folder dropped on windows as one job handles what happens when you drag and drop an entire folder into the HotFolder. By default a separate job will be created for each image in the folder. If Print folder dropped on windows as one job is activated, it will instead gather all images into a single job.
Conditional triggers specify if every image should be printed individually as soon as it arrives in the surveyed folder, or if several images should be gathered and combined before printing. There are several modes available:
Print collected images at this time lets you set a specific time of day when images should be printed. The HotFolder will gather all images dropped into it until this time and then create one job with all the images in it.
If this job length is exceeded will gather images into one job until the job reaches a certain length, then it is sent to print. You can set the desired length in the field Job Length Limit.
Minutes after first image lets you define a time interval in minutes. After an image is dropped into the HotFolder it will wait the set number of minutes before creating the job. Any additional images dropped into the HotFolder during that time will be included in the same job.
Options lets you make settings related to how the job enters the PrintQueue and how it is processed.
- Activate Preflight: Automatically generates a preflight for every job and stores it in C:\Users\Public\Documents\EsRip\17\Data\Preflight. The settings for the preflight can be changed in the JobComposer.
- Suspend RIP: Prevents automatic processing of a print job in the RIP Server. Jobs enter the PrintQueue in Suspended state and need to be started manually from there to start the RIP process.
- Suspend Printing: Prevents automatic printing of a print job in the PrintQueue. Jobs enter the PrintQueue and are rastered, but need to be started manually from there to start printing.
- Keep Rip Data after Printing: The rastered data is saved so that the job can be re-sent to the printer without having to be re-rastered.
- Generate Job Preview: Creates a preview that is displayed in the PrintQueue.
- Use Fotoba Print Marks: Adds Fotoba Printmarks to the job. This replaces any other printmarks defined in image presets. The Fotoba print marks must be configured in the JobComposer menu Tools > Application Defaults > Preferences > Job > Extras.
- Copies to Print: Set how many copies of the job should be printed, and which Gap setting to use.
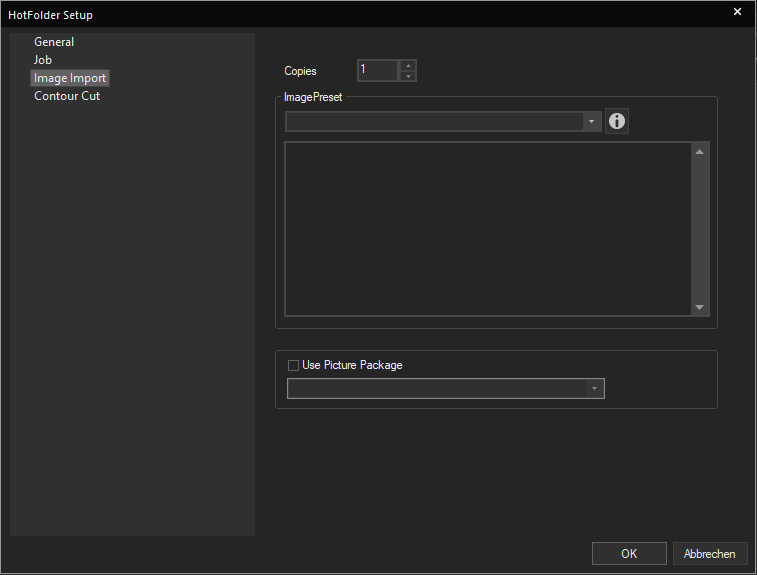
Image Import
Deals with settings specific to how the images are introduced into the job.
Number of Copies automatically creates a specified amount of copies of each image in the HotFolder.
ImagePreset selects an ImagePreset from the dropdown menu to apply it to every image to is processed. Note that scaling and positioning parameters from a Position Template set under Job Settings will take priority over the Image Preset, but all other parameters will still be applied.
Use Picture Package sets a Picture Package from the JobComposer to be applied to images processed by the HotFolder. Note that the Picture Package cannot be combined with a Position Template or ImagePreset in the HotFolder configuration. If you want to apply an ImagePreset you can assign it to a placeholder while creating the Picture Package and include it that way.
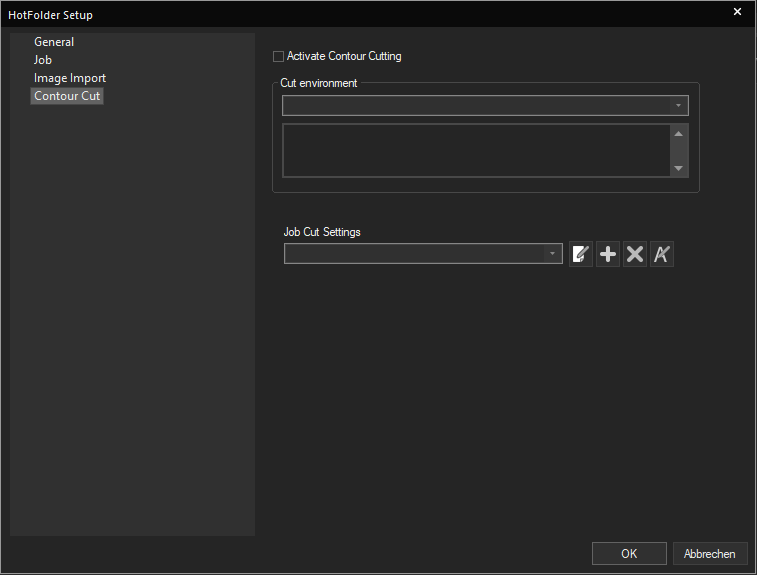
Contour Cut
Jobs created by the HotFolder can even be prepared for contour cutting automatically. If you intend to cut your HotFolder jobs with a cutter down the line either with a Print&Cut device or later with a cut only device, check the box Activate Contour Cutting and select the Cut Environment for the Cutter you want to use from the dropdown menu.
In Job Cut Settings, select or configure the Cut path you want to use.
While Contour Cut is active in the HotFolder settings, the HotFolder will automatically add the appropriate cut marks to images/jobs and jobs will be passed on to the CutQueue after printing for the cut process. You can find more information on Contour Cut in the respective chapter of the documentation.
Printing through the HotFolder
With the surveyed folder configured, make sure the HotFolder application is running and that it is set to “Online” i.e. that the dot on the top right shows Green.
Now drop an image file into the surveyed folder you configured in the General tab of the settings. You might want to place a copy of the image into the HotFolder rather than moving the image to keep your original. You can also drop Jobs from Orders files (.esor) into the HotFolder and have it create multiple jobs according to the information in the Job from Order file. For more information see Jobs from Orders.
You should then see the image file briefly appear in the log window of the HotFolder as it’s processed. Assuming your HotFolder is configured to print every single image, it will disappear after a moment and should then appear in the PrintQueue of the Print Environment you configured for the HotFolder. From there you can handle it like any other job. If the PrintQueue is set to online, the job will be sent on to the printer and printed.
Related Articles
What is Delta Automation?
In the fast-evolving landscape of digital printing productions, automation is quickly evolving from novelty to necessity. Automating print production to streamline processes from customer input to print output saves manual work, time and eliminates ...Print Environment and Media
Print Environments in the Ergosoft RIP contain the printer driver and the printer relevant settings. Selecting the Print Environment means selecting which printer the print job goes to and what settings are used to print (Port, Resolution, Passes ...Print Mode (Handling of Rastered Data)
Controls how the job is to be handled after being sent to the job queue. It consists of a a tag to identify the command, and On or Off attributes to turn the respective printmode on and off. The setting defined in the XML file itself overwrites the ...Jobs from Orders
Jobs from Orders is an automation function of Ergosoft 17 that lets you create jobs based on information in text files. Supply job information such as customer, order ID as well as parameters like number of copies and images (Or image folder) and let ...Groups
Groups let you package multiple images together so certain parameters can be applied to the group. With Groups, it is possible to create positioning specific to the Group, nest multiple groups inside a job, or apply Nesting parameters only inside the ...