Cutting Jobs
Cutting in the Ergosoft RIP is designed with the entire production workflow in mind. The focus was on making the entire cutting process in the RIP streamlined, from printing the Job with the JobComposers intuitive tools to sending the Job to the cutter after the material has been moved over to the cut device.
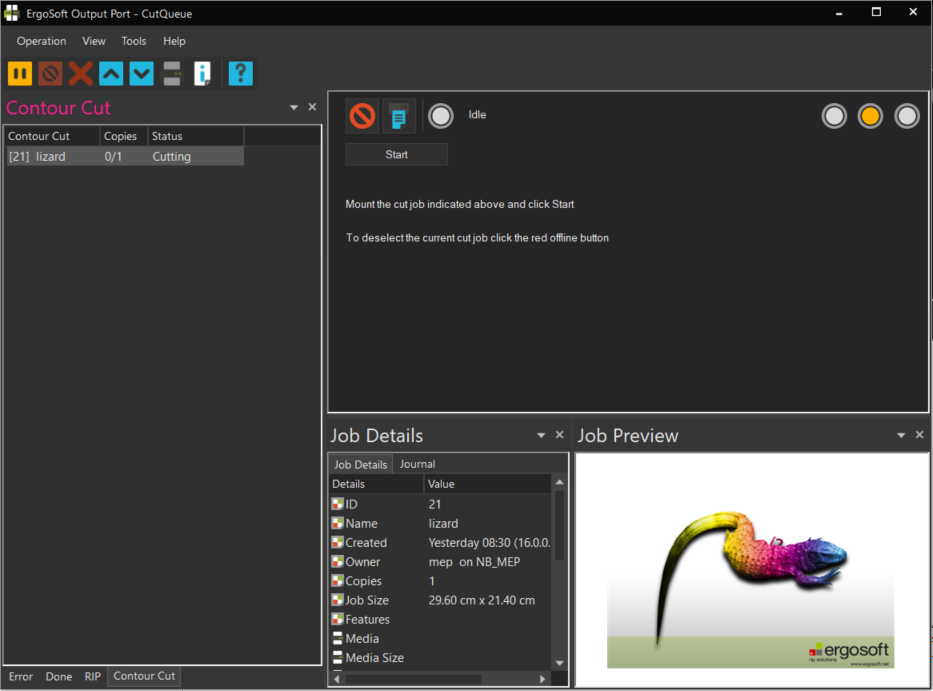
This is achieved with the Contour Cut button that toggles cutting application on or off. When the contour cut button is active, the Ergosoft RIP will automatically add appropriate cut marks to every printed Job, and after printing, the Job moves over to the CutQueue. While the Job waits in the CutQueue, the operator can move the printout over to the cut device and load it up. When everything is ready, the cut Job can be launched from the CutQueue, triggering detection of marks (Or prompting manual detection where needed) and starting cut. After cutting is completed, the job list entry moves back to the PrintClient and is marked as complete.
You can also find a interesting videos on using cut contour in Ergosoft in our Contour Cut Playlist on Youtube.
Activating Contour Cut
Assuming you’ve made the preparations outlined in the cut articles Cut Environment and Preparing Images for Cut, make sure you have the correct Cut Environment selected in the respective dropdown menu.
With the right Cut Environment selected, activate contour cut by toggling the Contour Cutting button. Doing this will tell the RIP that all Jobs printed are intended to be cut. The RIP will therefore print cut marks suited to the current Cut Environment with every Job, and restrict the material width to that of the cutter to ensure the material fits into the cutter later.
Preparing to send the Cut Job
Depending on what Cut Environment is being used, the cut dialog is accessed in two different ways. Make sure Contour Cut is active
Cut after Printing
For many cut devices, the RIP will prepare the print and the cut data at the same time. When you launch the Job using the Print button, you’ll first see the Print Settings dialog as normal. After you confirm the print with Ok, the cut dialog will pop up automatically after, letting you configure the cut path and other cut parameters before sending the cut Job.
If you notice that the Cut button is grayed out even if you have Contour Cut active, most likely the cut dialog will come up right after printing.
Cut using the Cut command (Cut Only drivers)
Some Cut Environments require the Cut Job to be launched manually. To do this, click the Cut button in the Toolbar. This will bring up the cut settings dialog letting you configure the cut path and other cut parameters before sending the cut Job.
Configuring what to Cut
The first Contour Cut window will show you a summary of the currently active Cut Settings. If these are correct, you can simply confirm with Ok to launch the cut job.
If this is your first time cutting in the Ergosoft RIP, you’ll want make adjustments to the cut settings and configure your cut path first. Click the Change... button to get to configure your settings.
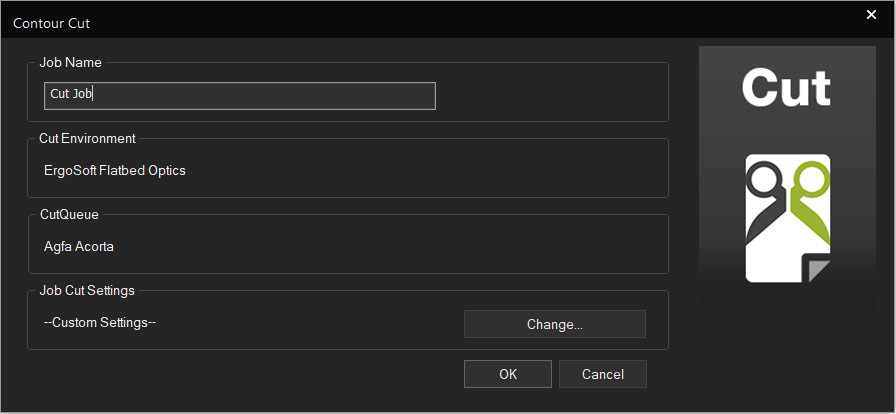
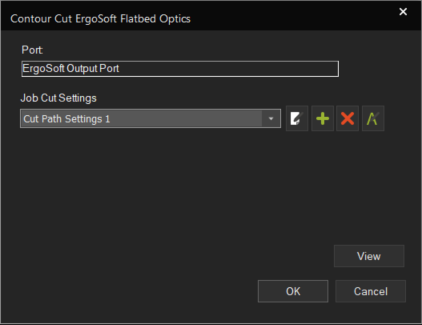
The next window will show you the active port name for your CutQueue and the path settings that are currently active. If you have predefined cut path settings, you can quickly switch between them here and confirm. If you want to make adjustments or define a new cut path, click the Edit or Add buttons to get to the Job Cut Settings.
In Job Cut Settings, every line in the list reflects one Pass of the cut process. A Pass consists of the setting for the path itself called Cut Path and the parameters for how this path should be cut (Pressure, Tool, etc.) called Cut Settings. While the cut path is crucial to being able to cut, a lot of the time the cut settings can be left on standard unless you have special application or tool in mind.
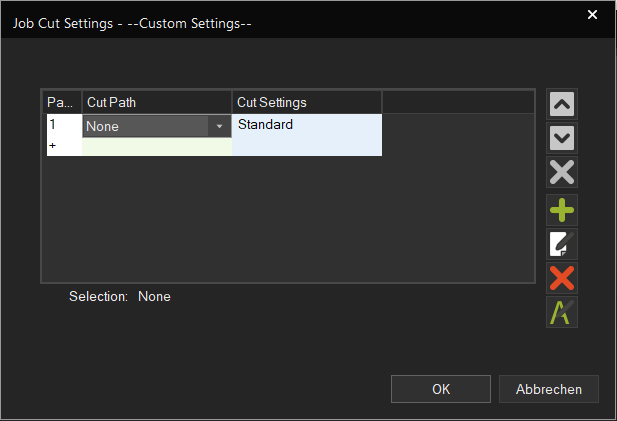
You can add additional Passes at any time by selecting an emtpy line and clicking into either the Cut Path or Cut Settings. This will show the dropdown menu again so you can select or edit the settings. As soon as a setting is present, the Pass line will be added.
Cut Path
To configure your Cut Path, click on either the Edit or Add buttons to bring up the configuration window. This is where you get to set which path in the image should be cut. Activate the method you want to use. Some are mutually exclusive, but you can always add another Pass if you have different types of cut lines in your image.
Path from Image Data
This segment configures paths that are in the image file. The following types are available:
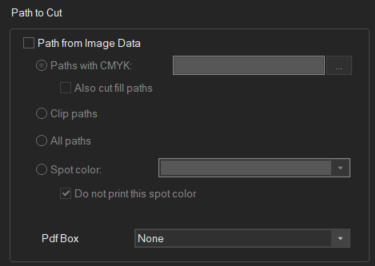
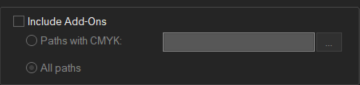
Paths from CMYK: Specifies cut paths set up with CMYK (e.g. 1% Cyan), click the button to the right to set you CMYK value.
Clip Paths: Activates cutting of Clip paths. All clip paths found in the image will be cut.
All Paths: Activates cutting for all paths found in the image file. So all paths found in the image will be cut.
Path from Spot Color: Specify the name of the Spot Color you used for your cut path by entering it into the field, but note that it is case sensitive.
Include Add-Ons
By default, the cut function will ignore paths and lines created by the RIPs own Image AddOns. However with this segment you can change that. By using Include AddOns, you can use paths generated through AddOns by specifying a CMYK value the paths are colored with, or simply cut all paths in the image including the ones from AddOns.
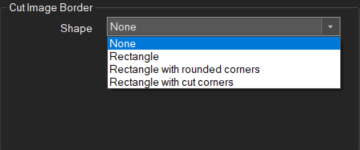
Cut Image Border
Automatically cuts around the image borders. No cut paths in the file are required for this. Image borders can be cut as a simple rectangle, as a rectangle with rounded corners, or a rectangle with cut corners.
When selecting one of the modes, further options appear.
Shrink by: Enter a value to shrink the cut rectangle. Negative values are also possible to enlarge the cut rectangle.
Cut only image rectangles: Cuts the rectangular edges of the images
Cut Image or Group rectangles: Cuts images rectangles of images that are not grouped and group contour rectangles of images that are grouped.
Cut only group rectangles: Cuts only the group contours of grouped images.
Cut Settings
The Cut Settings are parameters relating to the cutter and how it should handle the Job. The dialog lets you override certain settings from the Cut Environment such as pressure, speed as well as the paneling options. Additionally, you can configure what cut tool the cutter should use if multiple are available.
To configure your Cut Settings, click on either the Edit or Add buttons to bring up the configuration window. The available settings are split up in 3 tabs:
- Quality: Overwrites the settings for Speed, Pressure and accuracy from the Cut Environment settings. See Cut Environment for an explanation of the settings.
- Tools: Sets which tool the cutter should use for this pass. Of course only tools the cutter actually has can be used.
- Paneling: Overwrites the Paneling settings of the Cut Environment. See Cut Environment for an explanation of the settings.
Confirm the dialog with Ok to save your settings and return to your Pass settings. Confirm again to save your Cut Pass settings. You’ll be prompted to enter a name for your settings. This will allow you to easily identify and select between sets of settings later on.
Sending the Cut Job to the CutQueue and starting to Cut
When you’re back in the dialog where you select the Job Cut Settings, you can use the View button to have the RIP render the cut line according to your settings and show you a preview of what will be cut. This is a great way to check if everything is detected correctly and if the cut paths are correct.
If you are satisfied confirm again to get back to the original Contour Cut window. Click Ok to launch the Job.
If you are printing the Job first, it will first go to the PrintQueue until all print data is sent out. Once printing is complete, the Job will then move to the CutQueue.
If you are cutting directly using the Cut button, the Job will move directly to the CutQueue.
If you haven’t already, start the CutQueue either through the button in the JobComposer next to the CutEnvironment dropdwon menu, or from Tools > CutQueues.
Before proceeding, make sure your printed material is loaded into the cutter and ready to be cut.
In the CutQueue, the Job will go into the waiting list for Jobs to be sent out. What happens next depends on the current status of the CutQueue.
To set the Status for the CutQueue, use the three colored buttons on the top right of the CutQueue window.
If the CutQueue is set to Offline/Red, the Jobs in the waiting Queue will wait there indefinitely until the Status is changed to Start Manually or Online.
If the Status is set to Start Manually/Yellow the Jobs will wait in the waiting queue until the operator selects a Job and presses start to begin cutting that Job. This is usually the best choice for cutting since it allows you to load and prepare the material and make sure it is ready before sending out any data to the machine.
If the Status is set to Online/Green, all Jobs coming into the CutQueue are automatically sent on to the cut device. This is usually not recommended for cutters since the material needs to be loaded into the cutter and marks read. It can be useful for cutters that work through a frontend, where the Ergosoft RIP will just write cut data but not actually communicate with the cutter directly.
To launch your cut job set the CutQueue either to Start Manually and press start to begin sending data, or set the CutQueue to online to start sending data automatically. For some cutters, a prompt to read marks or load material will appear at this point. Simply follow the onscreen instructions to complete this process and begin contour cutting.
Related Articles
About Jobs
Open / Save Jobs in ErgoSoft RIPs In ErgoSoft RIPs, Jobs are a visual representation of your print material where you place your image files and position them according to your requirements. Job compositions can be saved and reopened any time, but ...Jobs from Orders
Jobs from Orders is an automation function of Ergosoft 17 that lets you create jobs based on information in text files. Supply job information such as customer, order ID as well as parameters like number of copies and images (Or image folder) and let ...Introduction to Contour Cut
In ErgoSoft RIPs, contour cut integrates seamlessly into the production workflow. For Jobs intended to be Cut, the RIP automatically constrains Job space to the width of the cutter to make sure the Job fits. It reserves space around the images and ...Queues
Print and CutQueues Queues act as waiting lists for Jobs that are sent to be printed. When a Job is sent out to print from the JobComposer, it is automatically passed on to the correct Queue set in the Print Environment Settings. The Job will then ...QueueManager
The QueueManager replaces the JobCenter of previous versions as the overview hub for all PrintQueues and Job processes across your production. Track Jobs that are currently being rastered, printed, cut, are waiting for processing or view Jobs that ...