Background Color Removal
The Background Color Removal Feature makes it possible to selectively remove certain colors from image files for printing. By defining a custom color value to remove, users can keep this color from being printed in the output without having to alter the image file itself.
Overview
The main purpose of the feature is to simplify and streamline applications that require printing onto colored materials such as textiles for T-Shirts, colored rigid substrates or colored Vinyl. Using Background Color Removal allows to remove colors that match the background color that the image is printed on and adjust colors in the image to take advantage of the material color, saving ink and manpower to not have to print e.g. black ink onto a black material or painstakingly removing black from that same image file.
For many applications that require white underprinting, this brings the additional benefit that removing the background color from the image makes it possible to automatically generate an accurate white layer to be printed under the image area, excluding the sections that do not need to be printed.
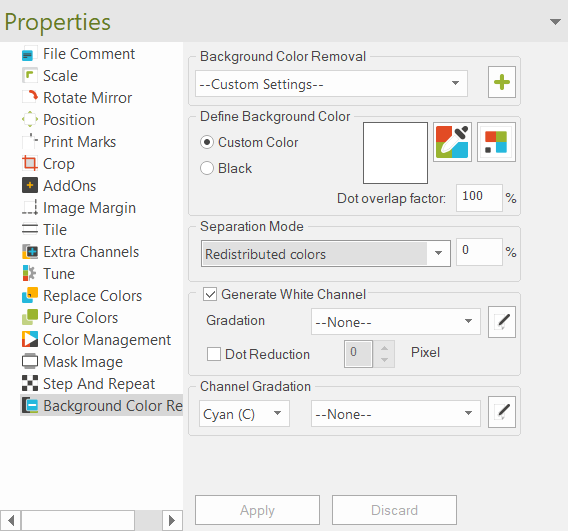
To access Background Color Removal, import the image file you wish to use into the JobComposer and make sure it is selected by clicking on it. In the properties bar, navigate to «Background Color Removal» to access the dialog.
The feature dialog is split up into 4 distinct sections:
- Defining Background Color
- Separation Modes
- Generate White Channel
- Channel Gradation
Background Color Removal can also be defined as a preset to be applied automatically to every job through Tools/Options Background Color Removal, or applied to every imported image through an Image Preset.
Defining the Background Color
By defining the background color, we specify which color should be removed from the image file. There are two modes available:
Custom Color: Lets you select a specific color by using either the color picker tool or colors from a Swatchbook. Using the Color Picker also lets you specify Lab, RGB or CMYK values to be removed. Using Custom Color allows you the set different separation modes that define how the background color is removed.
Black: Automatically Removes 100% Black color from the image. The black mode uses a standard separation mode that works well in most cases, but does not allow any custom adjustments.
Note that the JobComposer will still show the background color. The color removal happens during the rastering stage, so even if it will not be present in the printout, it will still be visible in the ErgoSoft RIPs image preview.
Dot Overlap Factor: This can be seen as a smoothing parameter for background color removal. It reduces artefacts in areas where color removal creates hard edges between removed and remaining color areas.
Values ranging from 85% to 99% can be considered safe and will likely not show detrimental effects on the image. Lower values for dot overlap may however cause desaturation of the image. White Layer generation is not affected by the Dot Overlap Factor.
Separation Modes
When using Custom Color to select a background color to remove, different separation modes become available. These modes define the method with which the background color is removed. Depending on the type of image that is being edited, different modes might work better than others.
Separated Device Colors: This method uses soft image manipulation to remove the background color. As such image quality is preserved, but ink saving might be lower than with other, more aggressive modes.
Redistributed Colors: A variation on the «Save Ink» method that allows to specify a tolerance for the color value that should be replaced. This allows to also remove areas that feature small variations in color, e.g. caused by compression artefacts in certain filetypes.
Tolerance: The percentage value next to the separation mode dictates how lenient Background Color Removal should be in identifying color values that should be removed. Higher tolerance will lead to more "similar" color values to be removed together with the specified value, e.g. removing black and using a tolerance of e.g. 30% will cause some adjacent gray values to be removed as well. This can be thought of like the tolerance setting of the magic wand tool in Adobe Photoshop. The Tolerance setting is available for all separation modes for custom color removal as well as "Black" removal.
Generate White Channel
Using Generate White Channel, the ErgoSoft RIP can automatically generate a white channel under the color layer to underprint white wherever there is color information. This allows to prepare the image for a white underprint without needing to actually alter the image itself. This feature is available in several places in the RIP and is also included directly in Background Color Removal for ease of use.
Gradation
Defines the gradation curve for the white layer. The gradation curve controls the relation between printed color pixels and the generated white pixels. There are 5 predefined settings available:
- None: Setting the gradation setting to «None» will automatically use a linear gradation from 0% to 100%.
- 100-100: Both 0% density and 100% density are set to be 100% percent ink. This will fill the entire image area with white at full density, including transparent background areas.
- 50%: Sets the maximum density to 50%, so at the highest density only 50% ink is applied.
- 50% Invers: Sets the maximum density to 50%, and also inverts the color channel. This means that white will be printed with at most 50% density and inverted, i.e. higher density in lighter areas and vice versa.
- Invers: Inverts the color channel with full density. This means that white will be printed with high density in transparent or low density areas and vice versa.
By clicking the «Edit» button, you can also create a custom gradation curve to apply density adjustments as required. For more information on this, see «Gradation curves».
The white color information will automatically be written into the channel designated as white in the Printing Ink Assignment. If no white channel is defined, no white channel is generated.
Dot Reduction: Shrinks the white area by the specified number of pixels along its edges. This helps if you notice the white layer show through at the edges of the color layer. The reduction is specified by pixels with a maximum value of 4.
Channel Gradation
Since removing background colors and underprinting white can have unintended effects to colors and color perception, the Background Removal function also allows to adjust the gradation of individual color channels to compensate for real or perceived color changes in the printed image.
By clicking the «Edit» button, you can also create a custom gradation curve to apply density adjustments as required. For more information on this, see «Gradation curves».
Gradation Curves
Both Generate White Channel and Channel Gradation feature Gradation curves that allow you to customize the density gain of an individual channel. To access the gradation edit window, click the «Edit» Button to the right of the gradation dropdown.
The horizontal axis represents the theoretical channel density. Think of this as the input density, i.e. the density for a channel that is defined in the file. The bottom left corner is zero or no density, the bottom right corner is the full or maximum density for the channel.
The vertical axis represents the output density of the channel. The bottom right corner is zero or no density, the top right corner is the maximum density.
Using this graph lets us map an input density value to an output density, affecting the ink output in that channel. An easy example would be if we notice that the white channel applies too much ink. By adjusting the vertical endpoint to a lower value, e.g. 70%), we specify that the maximum available density (100% on the input/horizontal axis) may not exceed the 70% of the vertical axis. This maps 100% input density to 70% output density effectively limiting the density of the white channel to 70%, decreasing ink application in a linear fashion as a result.
The gradation curve also lets you specify additional points in the curve itself by clicking any point on the line and dragging it to the desired point. This allows for complex adjustments and non-linear density gain to match and customize printer and ink behavior.
Related Articles
Media Background Simulation
Changes the background color of the Job in order to simulate the material color that an image will be printed on. This can be helpful to evaluate the effect that the material color might have on final output colors and helps you ensure that necessary ...Spot Color Replacement Preset no longer works after Ergosoft update
Problem/Question After updating Ergosoft, existing Spot Color Replacement Presets may no longer work as expected. You may notice that spot colors are not replaced correctly, even though the preset configuration itself appears unchanged. ...Introduction to Color Management System (CMS / CMM) and ICC Profiles
Color Management System / Module (CMS/CMM) In digital printing combining RGB (matrix-based) or CMYK (LUT based) source ICC profiles with CMYK (LUT based) or RGB (LUT-based) destination ICC profiles leads to the most common profile chain for the ...Color Spaces
Basics In technical terms, color is defined as a spectrum of wavelength that is reflected from a given object when it is hit by (white) light. White light itself is the combination of all wavelengths of the (visible) spectrum. To express this ...Measure Color
With Measure Colors, Ergosoft lets you use your Spectrophotometer to conduct spot measurements of colors and displays their color value. This can be useful if you want to doublecheck the numerical values of a printed color, or pick up a color value ...